PDF Signer Server User Manual
Sign PDF documents in bulk and automatically: the program watches a folder, signs every new document with your certificate, seal or qualified certificate, sends the signed documents by e-mail or to an FTP server, archives the originals and keeps a log. Made for companies, accounting departments and administrators; developers find PowerShell, C# and VB.NET examples at the end.
1. What is PDF Signer Server?
A PDF document (an invoice, a contract, a report) can be changed by anyone who has it. A digital signature solves two problems:
- Who signed it? The signature is created with a digital certificate: the personal certificate of a person, or the certificate of a company (an electronic seal), so it proves the origin of the document.
- Was it changed? If even one character of the document is modified after signing, the signature is reported as not valid.
PDF Signer Server adds digital signatures to PDF documents. You can sign one document, or select an input folder and an output folder and sign all the PDF documents of the folder at once (bulk signing). The program can also watch the input folder: every few seconds it looks for new documents and signs them, without anyone clicking anything. Around the signing it can send the signed documents by e-mail (even to a different recipient for each document), upload them to an FTP server, archive the original documents, move the documents that failed to an error folder, and write everything in a log.
The signature can be visible on the page (with the name of the signer, the date, the reason and the place of the signing, even with an image) or invisible. PDF Signer Server creates PAdES signatures (PDF Advanced Electronic Signatures, ETSI EN 319 142-1), the format of the advanced and qualified electronic signatures of the eIDAS Regulation (EU) No 910/2014, and the older PKCS#7 signatures, for the PDF readers that do not know PAdES. When the document is signed with a qualified certificate on a QSCD (a qualified signature creation device, such as a smart card, a USB token or a hardware security module), the result is a qualified electronic signature or a qualified electronic seal, with the legal effect described by the Regulation. The same applies to qualified time stamps. Section 7 explains this in detail.
The signed result is a new file, saved in the destination you choose. Your original documents are not touched, unless you ask the program to archive or delete them after the signing (section 13).
PDF Signer Server works with qualified certificates, qualified seals and qualified time stamps. If you need eIDAS Qualified Timestamps with full legal effect across the EU, visit https://qtsa.eu; section 7.5 explains how to use them.
What you can do with PDF Signer Server
- Sign a PDF document, or all the documents of a folder, with a certificate from the Windows certificate store, from a PFX / P12 file, or directly from a smart card, a USB token or an HSM through the PKCS#11 interface.
- Watch a folder and sign the new documents automatically (section 13).
- Choose the signature format from a single list: PAdES-B-B (recommended), PAdES-B-T (with time stamp), PAdES-B-LT (long term validation), PAdES-B-LTA (long term archival) and three older PKCS#7 formats; choose the hash algorithm (SHA256, SHA384, SHA512).
- Add a time stamp from a time stamp server, also a qualified time stamp (section 7.5).
- Choose the appearance of the signature: the page, the position, the text, the font and an image (section 9).
- Certify the documents and encrypt the signed documents with a password and restrictions (section 10).
- Send the signed documents by e-mail and upload them to an FTP server (section 14).
- Archive the originals, delete them after the signing and keep the failed documents in an error folder; all the actions are written in a log (section 13.2, section 17.1).
- Sign documents that are protected with a password, and rebuild documents with a damaged structure (section 11).
- Save the settings in files, and sign from the command line, without any window (section 18).
Who is this manual for?
- Users and administrators — sections 1 to 18 explain, step by step, how to install the product, register it, choose a certificate, sign documents and folders, set up the automatic signing, the e-mail and the FTP delivery, and check the signed documents.
- Developers — sections 19 to 21 explain that PDF Signer Server is built on the Signature Library (SignLib) and show how to create and verify the same PDF signatures from Windows PowerShell, C# or VB.NET.
PDF Signer and PDF Signer Server
Both products sign PDF documents with the same signing engine and the same signature formats. They are made for different jobs:
| PDF Signer | PDF Signer Server | |
|---|---|---|
| Made for | People who sign documents themselves | Companies that sign many documents, also automatically |
| Sign one document or all the documents of a folder | Yes (also several documents selected together) | Yes (one document, or a folder) |
| Watch a folder and sign the new documents automatically | — | Yes |
| Send the signed documents by e-mail, upload them to FTP | — | Yes |
| Archive or delete the originals, error folder, log of every action | — | Yes |
| Certificates from the Windows store and from PFX files | Yes | Yes |
| Smart cards, tokens and HSMs directly through PKCS#11 | — | Yes |
| Command line | Yes | Yes |
If you only need to sign documents from time to time, PDF Signer is the simpler choice.
Useful links
| What | Address |
|---|---|
| PDF Signer Server product page (information, purchase, download) | https://www.signfiles.com/pdf-signer-server/ |
| Download PDF Signer Server (free trial) | https://www.signfiles.com/apps/PDFSignerServer.msi |
| PDF Signer (for people who sign documents themselves) | https://www.signfiles.com/pdf-signer/ |
| Qualified eIDAS time stamps | https://qtsa.eu |
| EU Trusted Lists (the qualified trust service providers) | https://eidas.ec.europa.eu/efda/tl-browser/ |
| European Commission validation tool (DSS) | ec.europa.eu/digital-building-blocks/DSS/webapp-demo/validation |
| Validating digital signatures in Adobe Reader (guide) | ValidatingDigitalSignaturesInAdobe.pdf |
| Signature Library (SignLib) used by PDF Signer Server | https://www.signfiles.com/signature-library/ |
| Code samples: sign a PDF, automatic signature, PowerShell | pdf-digital-signature, automatic-pdf-signature, pdf-digital-signature-powershell |
| Support and contact | https://www.signfiles.com/contact/ |
2. Product installation
We recommend installing the product with an Administrator account. After the setup file is verified, the operating system might ask for your permission to install the program: click Yes.
What you need
- Windows 8 or later (including Windows 10, Windows 11 and Windows Server 2022).
- Microsoft .NET Framework 4.6.2 or newer. It is already part of the current versions of Windows 10, Windows 11 and Windows Server; for the other versions of Windows you can download it from the Microsoft site.
- A digital certificate to sign with. If you do not have one yet, you can create a test certificate (section 16).
Installation steps
- Download the setup file. Get
PDFSignerServer.msifrom the product page (direct link: https://www.signfiles.com/apps/PDFSignerServer.msi) and run it. - If Windows SmartScreen appears, allow the program to run. You may see the window Windows protected your PC. Click More info and then Run anyway. See the explanation below.
- Read the license agreement. Read the EULA (End-User License Agreement). If you want to continue, select I Agree and click Next.
- Select the installation folder. Keep the proposed folder, or click Browse... to choose another one. Choose Everyone to install the program for all the users of the computer, or Just me for your account only. Click Next.
- Wait for the setup to finish. When Installation Complete appears, click Close. The program is now installed.
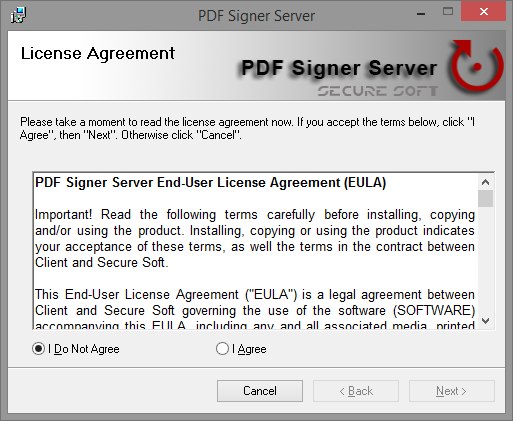
By default the program is installed in the folder Secure Soft\PDF Signer Server of Program Files (on a 64-bit Windows: C:\Program Files (x86)\Secure Soft\PDF Signer Server), and the program file is PDF Server.exe.
Where to find the program
After the installation, the icon of PDF Signer Server appears on the desktop and in the Windows Start menu. Double-click it to start the program.
The settings of PDF Signer Server and its registration belong to the Windows user account that uses the program (they are saved in the profile of that account, section 17), and the certificates of the Current User store belong to it as well. Set up the program once, with the account that will run it every day, for example the account of the computer on which the documents are signed automatically.
What is Windows SmartScreen?
SmartScreen is a protection built into Windows. When you run a program you downloaded, Windows compares it with a list of programs that are known and were already downloaded by many people. A program that Windows does not know yet, for example a new version that was published recently, is shown as an unrecognized app, and the window below appears.
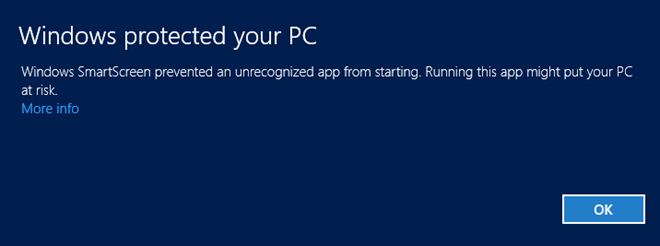
This message does not mean that the file contains a virus. It only means that Windows has no reputation data about it yet. To continue:
- Click More info. The name of the file and of the publisher are displayed.
- Click Run anyway and the setup starts.
Run the setup only if you downloaded it from www.signfiles.com. If you prefer, you can also right-click the downloaded PDFSignerServer.msi, choose Properties, tick Unblock (at the bottom of the General tab) and click OK. The setup then starts without the SmartScreen message.
3. Trial period and product registration
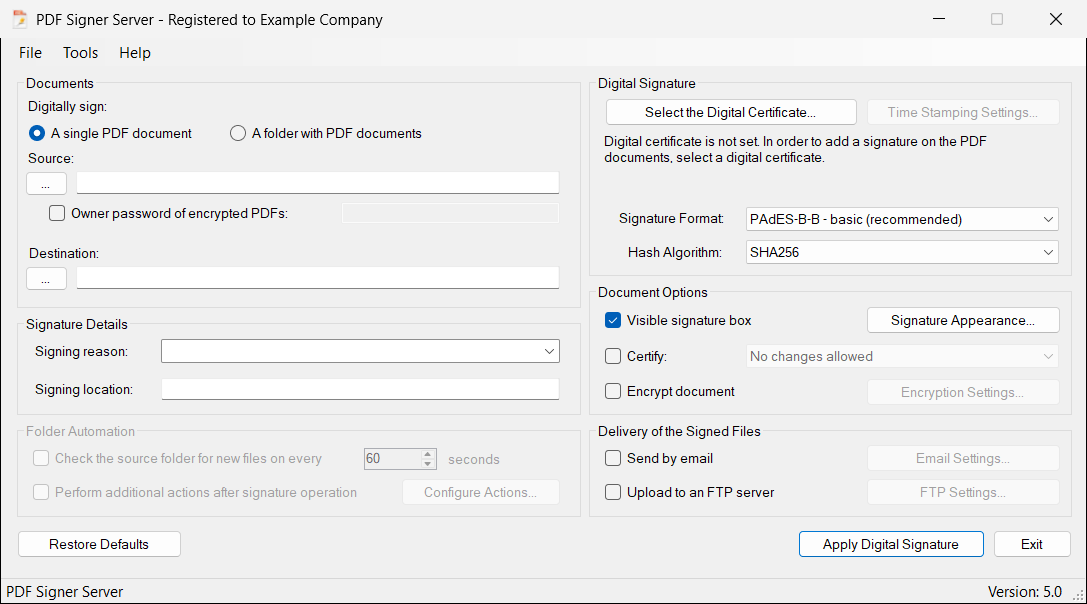
A new, unregistered installation works for a trial period. The title of the window shows how much is left, for example PDF Signer Server - Expires in 30 days, and the buttons Register Now and Buy Now! are visible.
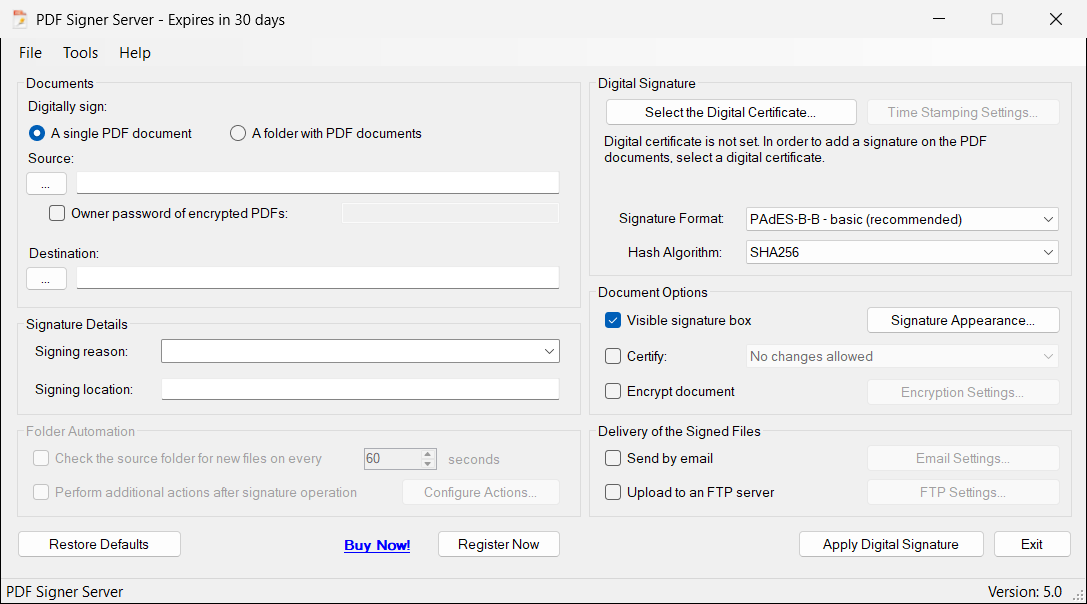
During the trial, PDF Signer Server writes the text PDF SIGNER SERVER DEMO VERSION in the lower left corner of the first page of the documents it signs. The registered version does not write it.

How to register the product
- Get a serial number. To register the product you need a serial number (also called license code). You can buy it online directly from the product page, https://www.signfiles.com/pdf-signer-server/. You can also click Buy Now! in the program, which opens the same page.
- Open the registration window. Open PDF Signer Server and click the Register Now button (or Help → Register Now...).
- Type the license code. Enter the received serial in the first box. The second box, Licensed to (optional), is for a name: if you type one, it is shown in the title of the window.
- Click Register. If the serial number is correct, the product is successfully registered.
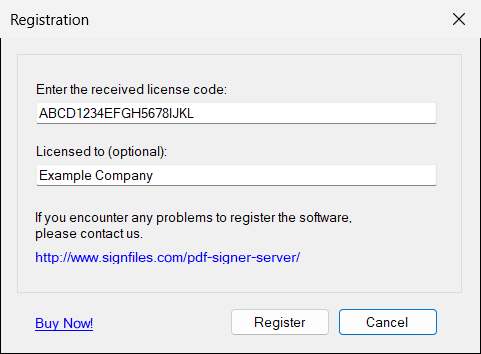
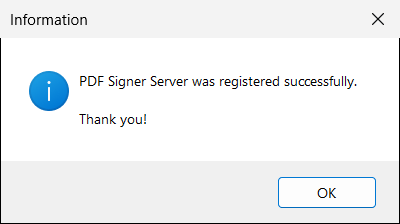
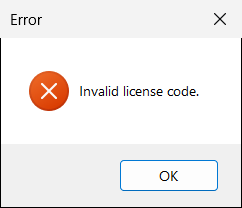
- The license code has 20 characters (letters and digits). Type it exactly as you received it. The messages License code cannot be empty. and Invalid license code. mean that the box is empty, or that the code was mistyped.
- The registration is saved for the Windows user account that registered the program and for this version of the program. If another person uses the same computer with a different account, the registration is done once more with the same code.
- The license of PDF Signer Server is a lifetime license: there are no monthly or yearly fees, and you can keep using the purchased version when a new version is released. The number of computers that the license covers, and the details about the technical support and the updates, are on the product page.
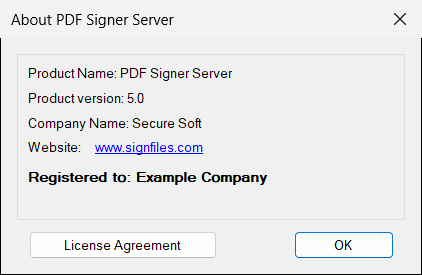
- Help → About... shows the version of the program and the registration status.
When the trial has expired, the title shows Expired on and a date, and the program no longer signs documents until you register: the window asks you whether you want to buy the registered version, and the command line stops with the message PDF Signer Server is not registered. (result code 2, section 18).
4. Sign your first document
This is the whole process. It takes less than a minute once you have a certificate. (To sign a whole folder, see section 12; to sign automatically, see section 13.)
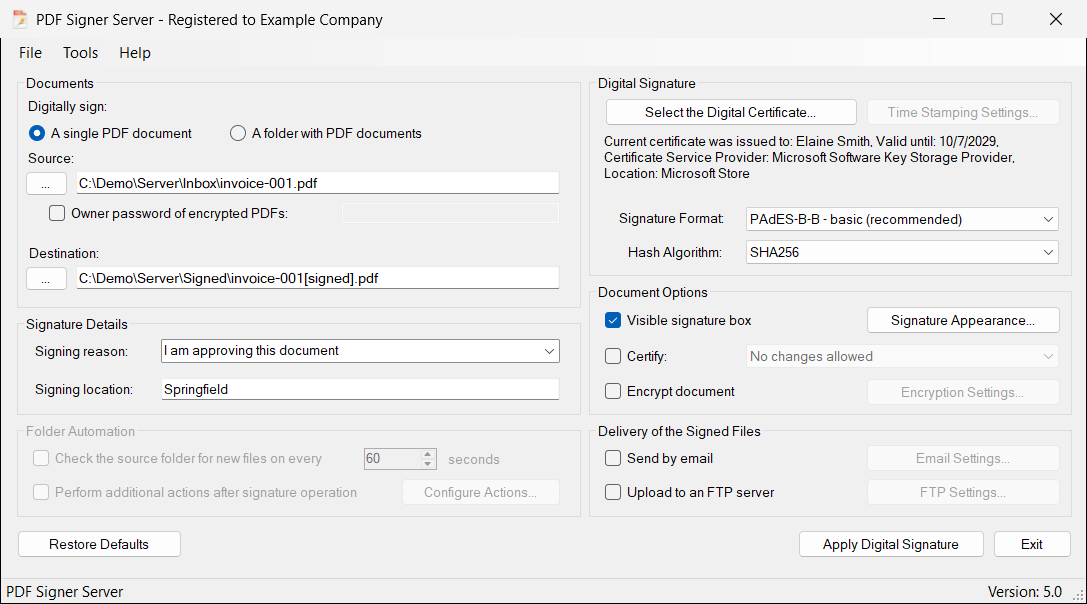
- Choose the document. Keep A single PDF document selected. Click the ... button under Source and select the PDF document you want to sign. The Destination is filled in for you: the same folder and the same name with
[signed]added. - Check where to save the signed document. If you want another place or name, click the ... button under Destination. The destination must be a different file from the source.
- Select your digital certificate. Click Select the Digital Certificate.... Choose the certificate from the Windows store (the certificates of a smart card or of a token are there too), a
.pfxfile or a PKCS#11 device, and click OK (details in section 6). - Leave the format on the recommended value. PAdES-B-B - basic (recommended) is already selected and is the right choice for most uses (see section 7.3).
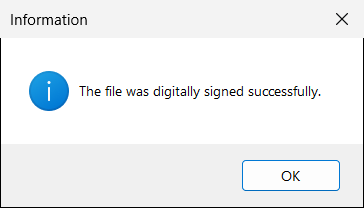
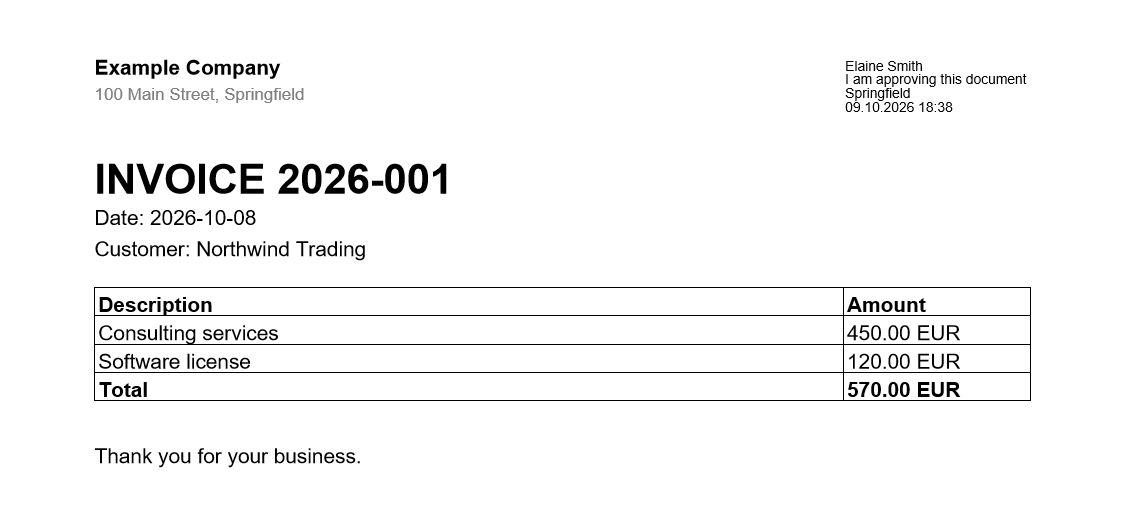
- Click Apply Digital Signature. After a moment you see a message that the file was digitally signed.
Drag a PDF document, or a folder, from Windows Explorer and drop it on the PDF Signer Server window. A document is selected as the source (the destination is proposed); a folder is selected as the source of the folder mode.
Open the signed document in a PDF reader. Adobe Reader shows the signature and a Signatures panel. A message such as Validity unknown is normal when the reader does not know the authority that issued your certificate; it does not mean that the signature is wrong. Section 15 explains how to check the signature, in PDF Signer Server and in Adobe Reader.
5. The main window
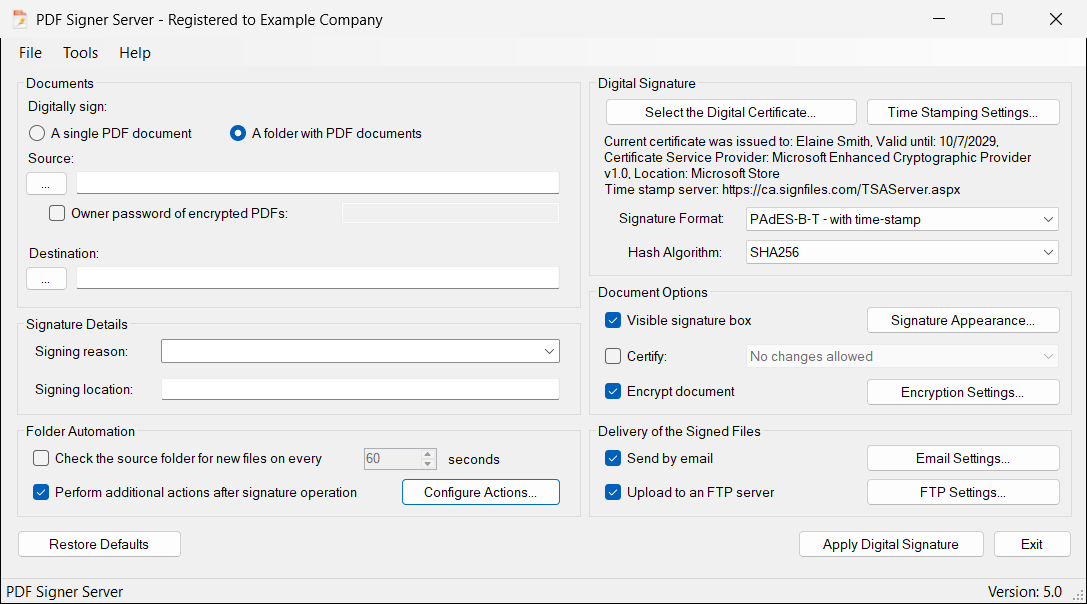
| Item | What it does |
|---|---|
| Digitally sign | Choose A single PDF document or A folder with PDF documents (all the PDF documents of the folder are signed). The folder mode is the one that can be automatic. |
| Source | The document (or the folder) you want to sign. Use the ... button to browse, or drag the document or the folder onto the window. |
| Owner password of encrypted PDFs | Only for PDF documents that are protected with a password. See section 11. |
| Destination | Where the signed document (or the signed documents) will be saved: a file for a single document, a folder for the folder mode. |
| Select the Digital Certificate... | Opens the certificate window (section 6). Below this button you always see which certificate is currently selected, until when it is valid, where its key is, and, for the formats that use a time stamp, the name of the time stamp server. |
| Time Stamping Settings... | Available only for the formats that use a time stamp (PAdES-B-T, -LT, -LTA and the PKCS#7 formats with time stamp). See section 8. |
| Signature Format | The kind of signature to create. The default, PAdES-B-B - basic, is the right choice for normal use. See section 7.3. |
| Hash Algorithm | The mathematical fingerprint used to detect changes: SHA256 (default), SHA384 or SHA512. Keep SHA256 unless the party receiving your documents asks for another one. SHA1 is still in the list for old systems, but it is considered weak: the program warns you when you select it. |
| Signing reason, Signing location | The reason of the signature (choose one from the list or type your own) and the place where you sign. They are saved in the signature and can be shown in the signature box. Both are optional. |
| Visible signature box and Signature Appearance... | When it is ticked, the signature is drawn on the page. The button opens the window where you choose the page, the position, the text, the font and the image of the signature (section 9). When it is not ticked, the signature is invisible: it appears only in the signature panel of the PDF reader. |
| Certify | Makes the signature a certifying signature (the signature of the author of the document) and sets what can still be changed. See section 10. |
| Encrypt document and Encryption Settings... | Protects the signed document with a password and sets what the recipients can do with it (print, copy). See section 10. |
| Folder Automation: Check the source folder for new files on every ... seconds | The program looks for new documents in the source folder at the interval you set, and signs them without any click (section 13). Available only in the folder mode. |
| Folder Automation: Perform additional actions after signature operation and Configure Actions... | Archives the original documents, keeps the documents that failed in an error folder, or deletes the originals after they are signed (section 13.2). Available only in the folder mode. |
| Delivery of the Signed Files: Send by email and Email Settings... | Sends every signed document by e-mail (section 14.1). |
| Delivery of the Signed Files: Upload to an FTP server and FTP Settings... | Uploads every signed document to an FTP server (section 14.3). |
| Apply Digital Signature | Signs the document or the folder now. While the documents of a folder are signed you can stop the operation with the Cancel button in the bottom bar; the bar also shows the progress. |
| Restore Defaults | Returns all the settings of the program, also those of the other windows (certificate, appearance, time stamp, encryption, e-mail, FTP, actions), to the original values, after you confirm. |
| Exit | Closes the program. The settings are saved automatically. |
| Status bar | At the bottom of the window: the selected document or the number of PDF documents of the folder, the progress and the result of the signing and, when the folder is watched, the time of the next check. At the right: the version of the program. |
| Buy Now!, Register Now | Visible only while the program is not registered (section 3). |
Menus
| Menu | Commands |
|---|---|
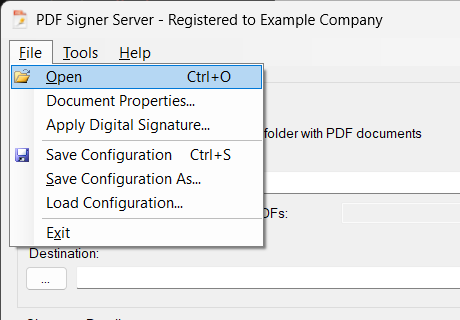
| File | Open (choose the source: a document or a folder; Ctrl+O), Document Properties... (shows the signatures of a document, section 15), Apply Digital Signature..., Save Configuration (Ctrl+S), Save Configuration As..., Load Configuration..., Exit. |
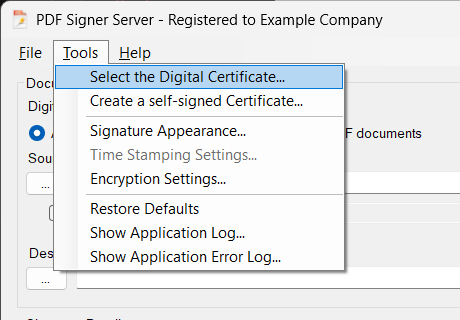
| Tools | Select the Digital Certificate..., Create a self-signed Certificate..., Signature Appearance..., Time Stamping Settings... (available when the format uses a time stamp), Encryption Settings..., Restore Defaults, Show Application Log... and Show Application Error Log... (section 17.1). |
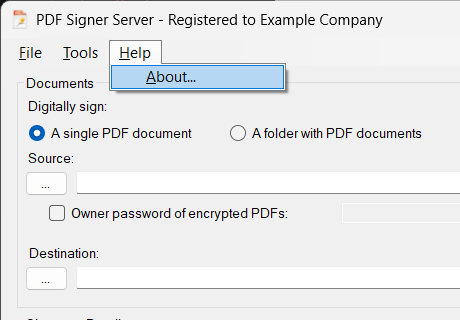
| Help | About... (the version of the program and the registration status) and Register Now... (only while the program is not registered). |
6. Digital certificates
A digital certificate is an electronic identity card, issued by a certification authority: for a person, or for a company (a certificate for electronic seals). To sign with PDF Signer Server you need one. This section explains where certificates are kept and how to select the one you want to sign with.
6.1 Where the certificates are stored
A certificate that can sign documents has two parts: a public key (the part other people see, inside the certificate) and a private key (the secret part, which only you have). The digital signature is created with the private key. PDF Signer Server can use certificates from:
- the Windows Certificate Store (the list of the certificates of Windows). The certificates of a smart card or of a USB token are in this list too, when the token is connected;
- a PFX (or P12) file;
- a smart card, a USB token or a hardware security module (HSM), directly through its PKCS#11 interface, without the Windows store (section 6.3).
The Windows Certificate Store
The Windows Certificate Store is the place where Windows keeps the certificates of the computer and of each user. PDF Signer Server shows its certificates in the window Digital Certificates, in the group Certificates Available on Microsoft Store.
The certificate store has nothing to do with the Microsoft Store where you download applications. It is only the traditional name of the list of certificates of Windows.
To see the certificates of your account, open the Windows Run window (press Win + R), type certmgr.msc and press Enter:
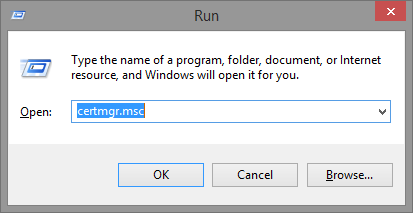
certmgr.msc in the Run window.Then open Personal → Certificates.
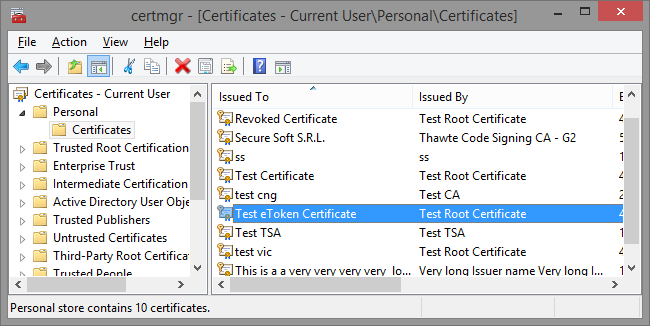
To create digital signatures, the certificates of the Personal store are used. They must have a public and a private key. You can check this by opening a certificate: in the General tab Windows writes You have a private key that corresponds to this certificate.
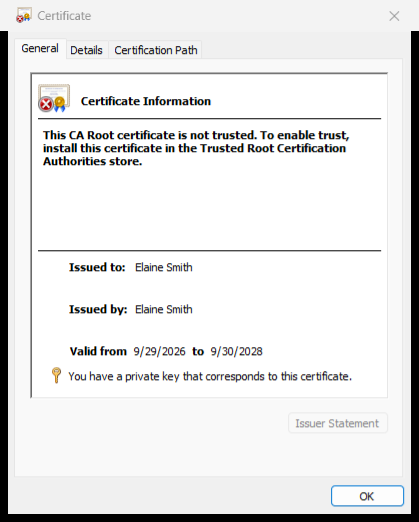
The private key itself can be stored:
- on the file system of the computer (for example, an imported PFX file);
- on a cryptographic smart card or USB token — see section 6.2;
- on an HSM (Hardware Security Module), a device that keeps keys for a company — see section 6.3.
The certificates are listed per store location: Current User (the certificates of the account that runs the program, the usual case) or Local Machine (certificates installed for all the users of the computer).
When PDF Signer Server runs on a computer where documents are signed automatically, the simplest certificate is a PFX file (its password is saved in the configuration), or a certificate of the Windows store that the account of the program can use. A certificate of the Local Machine store is available to all the accounts of the computer that have the right to use its private key.
PFX and P12 files
Another way to keep a digital certificate is a PFX (or P12) file. The file contains the public and the private key of the certificate, and it is protected by a password, to keep the key pair safe.
A PFX/P12 file can be imported into the Windows Certificate Store: just open the file (double-click it) and follow the Certificate Import Wizard. After that, the certificate is available in the Personal list and you can select it from the Windows store without the file.
6.2 Certificates stored on smart cards or USB tokens
If your certificate is stored on a smart card or on a USB token (like Aladdin eToken or SafeNet), the private key never leaves the device: it signs inside the device. This is the kind of device used for qualified certificates (QSCD, see section 7).
PDF Signer Server uses such a certificate through the Windows Certificate Store. When the token is inserted in the USB port, its driver or middleware (the software delivered with the token) usually imports the certificate in the store automatically. If the certificate does not appear in the store, it cannot be used this way: ask your vendor how to add it, and look at the options of the middleware (for example, an option that copies the certificates of the token to the local Windows store). A device can also be used directly through the PKCS#11 interface (section 6.3).
When you sign, the token asks for its PIN. The window belongs to the middleware of the token, for example:
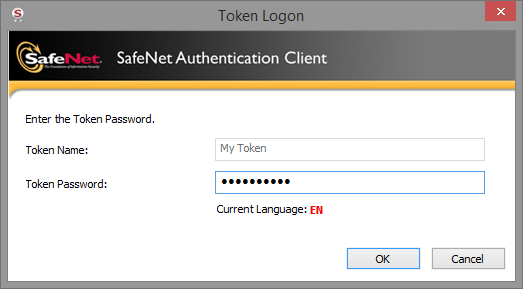
If the token is not connected, its certificate is not in the Windows store: the main window shows Digital certificate is not set under the certificate button, and when you click Apply Digital Signature the program asks you to select a certificate. Insert the token, select the certificate again and sign.
Normally the PIN is requested every time you sign. If you do not want the PIN window (for example when the documents are signed automatically, section 13), tick Smart Card PIN in the certificate window and type the PIN. This is possible only when the selected certificate is on a token or a smart card (a certificate of your computer has no PIN), and the PIN is emptied when you select another certificate. The PIN is saved in the configuration file of your Windows account, in encrypted form, and it is not shown again. Do not give your configuration files to other people. This function does not work with all the tokens (it depends on their drivers): when it does not work, the PIN window of the middleware is shown, or the signing stops with a message; in this case untick the option. If the card rejects the PIN, PDF Signer Server stops using it (so your card does not get locked by repeated wrong attempts): correct it in the certificate window and try again.
Most tokens are blocked after a few wrong PIN attempts (usually three). Do not try the PIN again and again: if the PIN is rejected, stop and check it first, for example by signing a document with another program that uses the token. When the PIN is rejected, the signing of a folder stops at once, and the automatic signing is switched off.
6.3 Smart cards, tokens and HSMs through PKCS#11
PKCS#11 is the standard way in which a program uses the keys of a token, of a smart card or of a hardware security module (HSM): the manufacturer of the device provides a library (a .dll file) and the program asks the device, through that library, to sign. PDF Signer Server can use a device in this way directly, without the Windows store. This is useful for HSMs and for computers where the middleware of the device does not copy the certificate in the Windows store.
In the certificate window select PKCS#11 interface and fill in:
| Field | What to write |
|---|---|
| PKCS#11 driver path | The library of the manufacturer of the device (a .dll file), for example C:\Program Files\Vendor\pkcs11.dll. It is installed together with the middleware or the driver of the device; its name depends on the manufacturer, so look for it in the documentation of the device. |
| Slot number | The slot of the device that holds your key. The first slot is 0. If the computer has several readers or devices, the slot is the one where your token is. |
| PIN | The PIN of the device. It is saved in the configuration file, in encrypted form. |
| Select .CER file... | The public certificate that belongs to the key of the device, as a .cer or .crt file (it contains no secret). You get it from the provider of the certificate, or you export it from the device or from the Windows store. The program uses it to find the right key on the device. |
| Test | Checks the library, the slot, the PIN and the key. When all are right you see Device works as it should and contains the corresponding private key. |
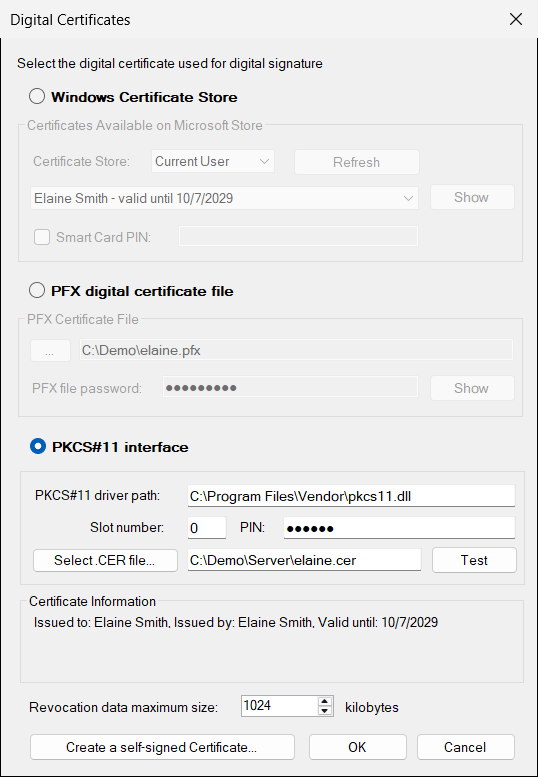
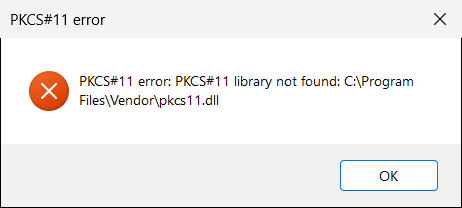
A wrong PIN repeated many times blocks the device. Test uses the PIN once, and tells you whether everything is right. If the device rejects the PIN, PDF Signer Server stops signing with it, as described in section 6.2.
A qualified certificate on a QSCD, for example a hardware security module that is certified for this use, gives qualified electronic signatures or seals. Because the device signs inside, with a PIN that the program can keep, this is the usual way to seal documents automatically (section 7). Ask the provider of the device and of the certificate how to use it with PKCS#11.
6.4 Select the digital certificate for creating signatures
To digitally sign a document, a digital certificate must be selected first. Click Select the Digital Certificate... (or Tools → Select the Digital Certificate...). The certificate can be in the Windows store, in a PFX file or on a PKCS#11 device.
Option A: a certificate installed in Windows
Certificates installed on the computer, or stored on a USB token or smart card that Windows knows, appear in Windows Certificate Store.
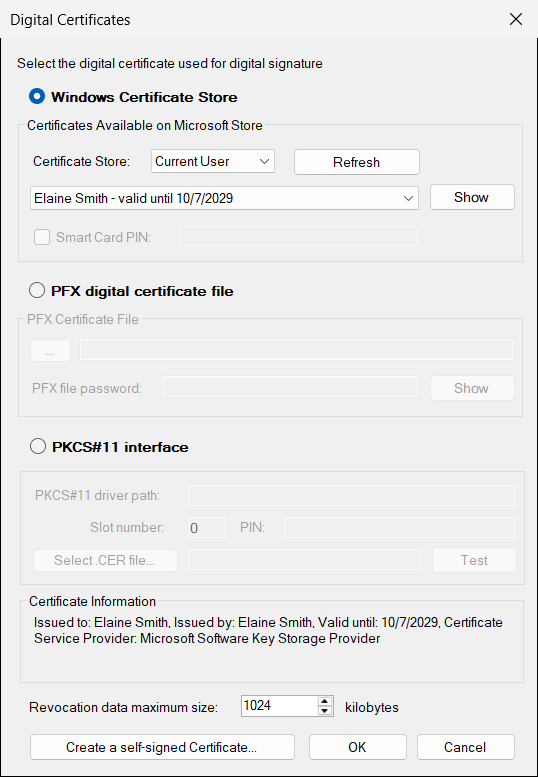
- Select Windows Certificate Store.
- In Certificate Store choose Current User (the usual case) or Local Machine (certificates installed for the whole computer).
- Pick your certificate from the list. Each line shows the name of the owner and the expiry date; a certificate that declares itself qualified is marked (qualified certificate), and an expired one is marked EXPIRED. The issuer is written in Certificate Information, under the list. Show displays the full certificate.
- If your token was inserted after the window was opened, click Refresh: the list is read again from Windows and your selection is kept.
- If the certificate is on a smart card and you want to avoid the PIN window, tick Smart Card PIN and type the PIN. This is possible only for a certificate on a token or a smart card (section 6.2).
- Click OK.
The list shows only the certificates that can create signatures: they have a private key, they are not meant only for encrypting and they are not certificates of a web server. The most suitable certificate is the first one: a valid one, a qualified one, one with the non-repudiation usage, the one that expires last. When no certificate was selected before, this one is selected for you. The expired certificates (and those that are not valid yet) are at the end of the list, so that you see why they cannot be used: when you select one, the program warns you, and OK does not accept it.
Option B: a PFX file
Some certificates are delivered as a file with the extension .pfx (or .p12), protected by a password.
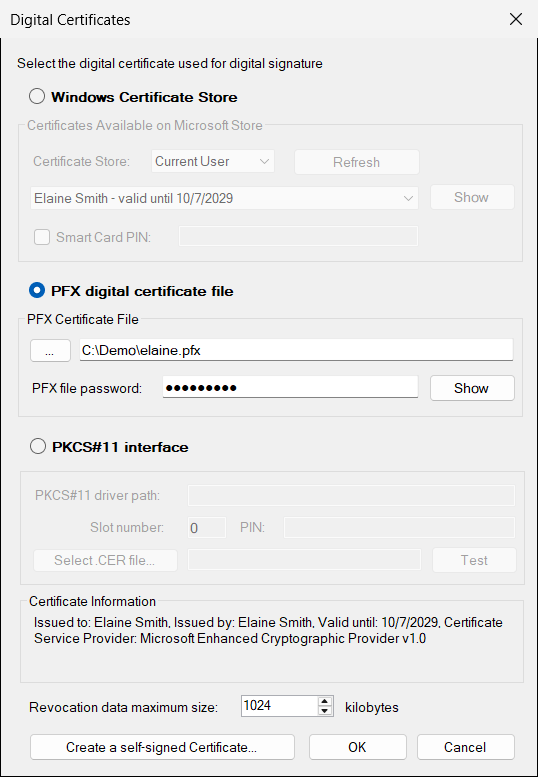
- Select PFX digital certificate file.
- Click ... and pick your
.pfxfile (or type its path). - Type the PFX file password. When you leave the box, the Certificate Information box shows the certificate, so you can check that you picked the right file; the Show button next to the password displays the certificate.
- Click OK.
Option C: a PKCS#11 device
Select PKCS#11 interface and fill in the library, the slot, the PIN and the certificate file as described in section 6.3.
Certificate Information
In the middle of the window, Certificate Information summarizes the selected certificate: to whom and by whom it was issued, until when it is valid, and the provider of its private key. The same summary is shown under the certificate button of the main window. Both RSA and ECDSA (elliptic curve) certificates are supported.
Revocation data maximum size
At the bottom of the window, Revocation data maximum size (1024 kilobytes by default) limits the validation data (CRL, lists of cancelled certificates) that the long-term signatures (PAdES-B-LT and PAdES-B-LTA) store in the document. Keep the default value.
If the certificate is expired or not valid yet, or its private key is missing, PDF Signer Server refuses to sign and explains why. Renew the certificate or choose another one. If you have no certificate yet, the button Create a self-signed Certificate... opens the creation of a test certificate (section 16).
7. eIDAS electronic signatures, seals, time stamps and signature formats
PDF Signer Server creates the signatures that the European Union uses for electronic signatures on PDF documents: PAdES signatures (ETSI EN 319 142-1). This section explains how they relate to the eIDAS Regulation (EU) No 910/2014, what you need to obtain a qualified electronic signature or a qualified electronic seal, why a qualified time stamp is useful, which format to choose, and how to check the result with the tools of the European Union.
7.1 The levels of electronic signatures in the eIDAS Regulation
| Level | What it means |
|---|---|
| Electronic signature | Any data in electronic form that the signer uses to sign. It has no special requirements. |
| Advanced electronic signature (AdES) | A signature that is uniquely linked to the signer, identifies the signer, is created with data that the signer keeps under the signer's sole control, and detects any later change of the document (Article 26). PAdES is one of the formats of the advanced signatures. |
| Qualified electronic signature (QES) | An advanced signature that is created by a qualified signature creation device (QSCD) and is based on a qualified certificate issued by a qualified trust service provider. A qualified electronic signature has the equivalent legal effect of a handwritten signature and is recognised in all the Member States (Article 25). |
The same rules apply to electronic seals. A seal is the signature of a legal entity (a company, an institution), created with a certificate for electronic seals. A qualified electronic seal enjoys the presumption of integrity of the data and of correctness of the origin of the data (Article 35). A seal is the natural choice for documents that a company issues automatically, such as invoices, and PDF Signer Server signs with a seal certificate in the same way as with a signature certificate.
A qualified electronic time stamp, issued by a qualified time stamping service, enjoys the presumption of the accuracy of the date and the time it indicates and of the integrity of the data to which they are bound (Article 41). Section 7.5 explains how to use it.
7.2 What you need for a qualified signature or seal
The level of a signature is given by the certificate and by the device that holds its private key, not by the software. PDF Signer Server creates the signature in the PAdES format that the validators expect, and it works with all the kinds of certificates:
| Certificate and private key | Result |
|---|---|
| A qualified certificate for electronic signatures whose private key is on a QSCD (a smart card or a USB token, used through the Windows store, section 6.2, or through PKCS#11, section 6.3) | A qualified electronic signature (QES). |
| A qualified certificate for electronic seals whose private key is on a QSCD (a smart card, a token or a hardware security module, used through the Windows store or through PKCS#11) | A qualified electronic seal. |
| A certificate issued by a certification authority, kept in the Windows store or in a PFX file | An advanced electronic signature (or seal), if the certificate identifies the signer and the key is under the signer's sole control. |
| A self-signed certificate (section 16) | A technically correct signature that nobody else trusts. Use it only for tests. |
When the selected certificate declares itself as a qualified certificate, PDF Signer Server writes (qualified certificate) after its name, in the certificate window. This mark is only an indication that is read from the certificate: the qualified status itself is given by the EU Trusted Lists (see section 7.4).
Qualified certificates are issued by qualified trust service providers, which are listed in the EU Trusted Lists. The provider gives you the certificate on a QSCD, usually a smart card, a USB token or a hardware security module. Install the driver of the device, and select the certificate in PDF Signer Server as explained in section 6.
7.3 Signature formats
The format decides how much information is stored inside the signature. If you are not sure, keep the first one. The four PAdES-B formats are the baseline profiles of ETSI EN 319 142-1, the formats recognised for advanced and qualified signatures. All of them are in the single list Signature Format of the main window:
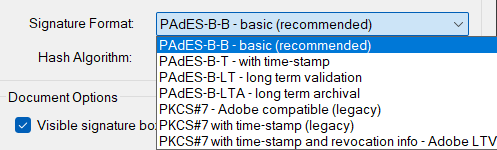
| Format in the list | What it adds | When to use it |
|---|---|---|
| PAdES-B-B — basic recommended | The signature, the signer's certificate and the signing time. | Everyday use: invoices, contracts, exchanged documents. Works offline and needs no extra settings. |
| PAdES-B-T — with time-stamp | A trusted time stamp from an independent server that proves the exact time of signing. | When you must prove when the document was signed. Needs an Internet connection (see section 8). |
| PAdES-B-LT — long term validation | Time stamp plus the certificates and the revocation proofs (OCSP/CRL) of the signer, stored in the document. | Documents that must stay verifiable for years, even after the certificate expires or the servers of the issuer are gone. |
| PAdES-B-LTA — long term archival | Everything from LT plus a document time stamp that protects the proofs. | Archives that must remain provable for many years. |
| PKCS#7 — Adobe compatible legacy | The older adbe.pkcs7.detached signature. | Only when the receiving software is old and does not accept PAdES signatures. |
| PKCS#7 with time-stamp legacy | The older signature plus a time stamp. | Only for old systems that need it. It needs a time stamp server. |
| PKCS#7 with time-stamp and revocation info — Adobe LTV legacy | The older signature, a time stamp and the revocation data stored inside the signature (the older long term validation method of Adobe). | Only for old systems that need it. It needs a time stamp server. |
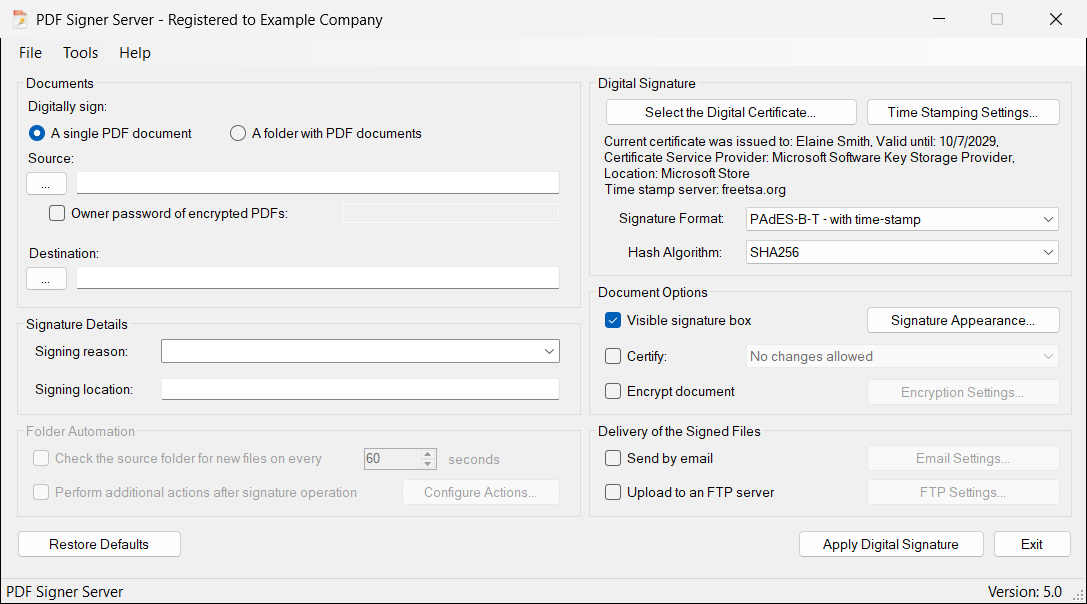
The letters B, T, LT and LTA come from the standard: Basic, Time-stamp, Long Term and Long Term Archival.
The LT and LTA formats store in the document the certificates and the revocation proofs (OCSP responses and CRLs) that are available when you sign. A certificate issued by a certification authority normally has them. A self-signed test certificate has none, so the document contains only the certificate itself. The computer must be able to reach the time stamp server (and, for a certificate of a certification authority, its validation servers) while it signs; when it cannot, the signing fails and the reason is written in the error log.
The LT and LTA formats add the validation data to the document after the signature, and an encrypted document cannot be changed anymore. PDF Signer Server does not allow Encrypt document together with PAdES-B-LT or PAdES-B-LTA, and tells you to select PAdES-B-T or to leave the document unencrypted (section 10).
7.4 The EU Trusted Lists and the validation of the signature
The EU Trusted Lists are the lists published by the Member States with the qualified trust service providers and their services (browse them here). The programs that validate signatures read them to decide whether a certificate is qualified and whether its key was on a QSCD.
Adobe Reader uses the European Union Trusted Lists too: a signature made with a certificate of a provider that is listed there is shown as valid, without any setting, and a qualified signature is marked as such:
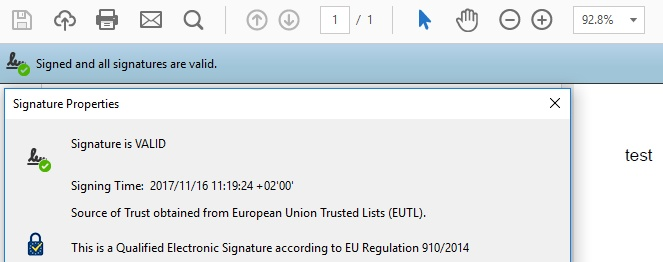
For a certificate that is not in the Trusted Lists (for instance a certificate of your company, or a test certificate) Adobe Reader reports the validity as unknown, until its user trusts the certificate (section 15).
Validate the signature with the European validator
The European Commission publishes an open validation tool, DSS (Digital Signature Service, part of the eSignature building block), that checks signatures according to the eIDAS rules. You can use it to confirm that a document signed with PDF Signer Server carries a correct PAdES signature and to see its level:
- Open the validation page. Go to ec.europa.eu/digital-building-blocks/DSS/webapp-demo/validation.
- Select the signed document. Choose the signed PDF document.
- Validate. Keep the default validation policy and start the validation. Read the Simple Report; the Detailed Report and the Diagnostic data explain every check.
The report shows, for each signature:
- the signature format, for example PAdES-BASELINE-B, -T, -LT or -LTA;
- the signer and the certificate chain;
- the signing time or the time of the time stamp;
- the indication of the validation (passed, failed or indeterminate);
- the qualification of the signature. The validator reads the EU Trusted Lists and tells you whether the certificate is qualified and whether its key was on a QSCD. A qualified signature is reported as a qualified electronic signature (QESig); a qualified seal as a qualified electronic seal (QESeal).
The result depends on the certificate you used. With a qualified certificate on a QSCD, from a provider listed in the EU Trusted Lists, the validator can report a qualified signature. With a self-signed test certificate, the validator cannot build a trusted chain, so it reports the signature as not trusted (indeterminate), even if the document is correct. Use the long term formats (PAdES-B-LT or -LTA) for documents that will be checked years later, because they keep the certificates and the revocation data inside the document.
Do not upload documents with private content to a public service. For confidential documents use a validation tool installed on your own computer, or the Adobe Reader.
7.5 Qualified time stamps: qtsa.eu
We provide eIDAS Qualified Timestamps issued by a Qualified Trust Service Provider (QTSP) listed in the European Union Trusted Lists (EUTL) under the eIDAS Regulation. If you need eIDAS Qualified Timestamps with full legal effect across the EU, visit our dedicated website: https://qtsa.eu
A time stamp proves that the document existed at a given moment and was not changed since. A qualified time stamp is issued by a qualified trust service provider that is listed in the EU Trusted Lists, and it enjoys, in all the Member States, the presumption of the accuracy of the date and the time (Article 41 of the eIDAS Regulation). Together with a qualified signature or seal it proves both who signed the document and when, with the legal effects described in section 7.1.
PDF Signer Server can use any time stamp server that follows the RFC 3161 standard, so the product works with certificates, seals and time stamps that are qualified. To add a qualified time stamp to your signatures:
- Get the access data. The provider of the qualified time stamps gives you the address of the server and, usually, a user name and a password.
- Open the time stamp settings. Select a format that uses a time stamp (PAdES-B-T, PAdES-B-LT or PAdES-B-LTA) and click Time Stamping Settings... (section 8).
- Type the address and the access data. Write the address in Time Stamp Server URL; tick Time Stamp Server requires authentication and type the user name and the password in their own boxes, not in the address.
- Test the server. Click Test the Server. The program asks for a time stamp with the values of the window and shows who issued it. If the time stamp declares itself as a qualified one, the message says (qualified time stamp).
- Sign. From now on every signature gets a time stamp from the server you set, also in the automatic signing.
The address that PDF Signer Server starts with is a free server, good to try the product. It does not issue qualified time stamps. For documents that need the legal effect of a qualified time stamp, use the address of a qualified provider.
8. Time stamp settings
A time stamp is issued by a Time Stamp Authority (TSA), an independent service. It proves that your signature existed at a given moment and cannot be back-dated. It is used by PAdES-B-T, -LT, -LTA and by the PKCS#7 formats with time stamp. Open the window with Time Stamping Settings... (also in the Tools menu); the button is available only when the selected format uses a time stamp.
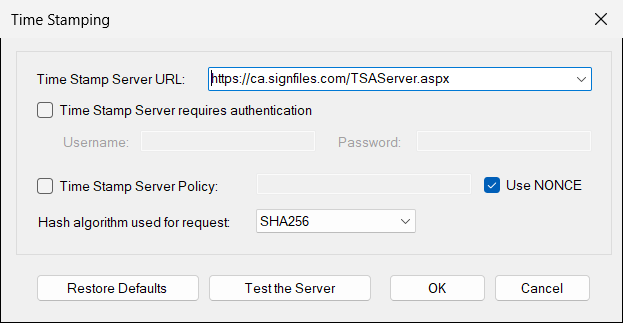
| Setting | Meaning |
|---|---|
| Time Stamp Server URL | The web address of the TSA service. Type the address given by your provider (section 7.5). The list contains some public servers, for tests. |
| Time Stamp Server requires authentication | Tick it and type the Username and Password if your provider requires them. |
| Time Stamp Server Policy | Tick it only if your provider asked you to send a policy identifier, and type it (it must be a number sequence like 1.2.3.4.5). |
| Use NONCE | A random number that protects the request from being replayed. It is ticked by default; keep it unless your provider asks otherwise. |
| Hash algorithm used for request | SHA256 by default. |
| Test the Server | Requests a time stamp with the values of the window (they do not have to be saved) and shows the result. Use it before you sign. |
| Restore Defaults | Puts all these values back to the original ones. |
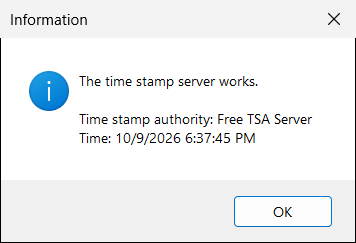
The computer must be able to reach the time stamp server while signing. If the address is not valid, PDF Signer Server tells you to set it before signing, and if the server cannot be reached, the document is not signed and the message explains why. The formats without a time stamp (PAdES-B-B and PKCS#7) work without any server.
Under the certificate, the main window shows only the name of the time stamp server (not the whole address), because some providers put the user name and the password in the address.
9. The appearance of the signature
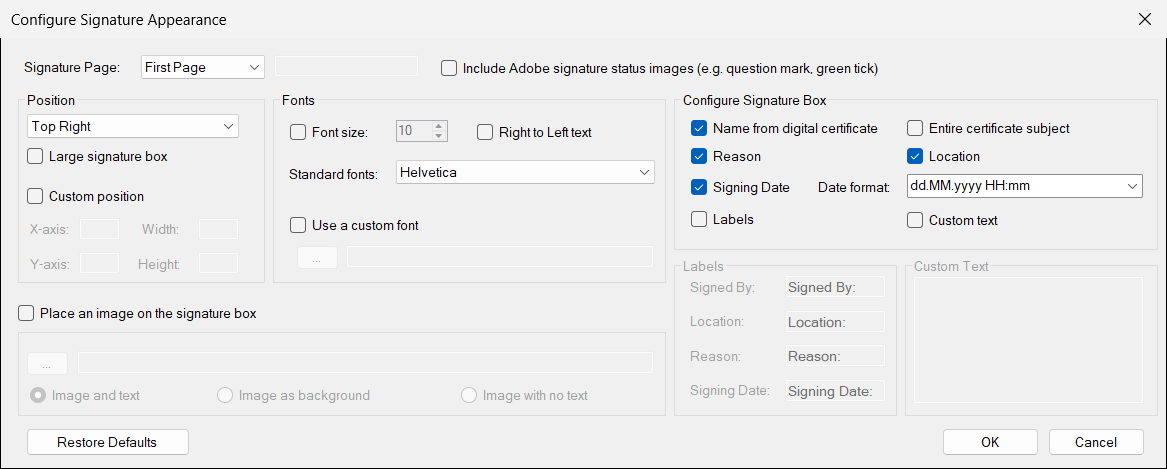
When Visible signature box is ticked, the signature is drawn on the page: by default in the upper right corner of the first page, with the name of the signer, the reason, the place and the date. Click Signature Appearance... to change it.
| Setting | Meaning |
|---|---|
| Signature Page | First Page (default), Second Page, Last Page, All Pages (a signature on every page) or Custom Pages. For Custom Pages type the pages in the box next to the list, separated by commas, for example 1, 3, last (last is the last page). When a document has fewer pages than the choice needs, PDF Signer Server adjusts the choice: Second Page on a document with one page signs the page 1, and the pages of the list that do not exist are skipped (the last page is used when none of them exists), so a whole folder of documents with different lengths can be signed with the same settings. |
| Include Adobe signature status images | Draws in the signature box the older image of the status of the signature (a question mark, a green tick) that Adobe Reader changes after the validation. |
| Position | One of six places of the page: Top Right (default), Top Middle, Top Left, Bottom Right, Bottom Middle, Bottom Left. Large signature box makes the box bigger. |
| Custom position | Tick it to place the box exactly: X-axis and Y-axis (the place of its lower left corner), Width and Height. The numbers are in points (1 point is 1/72 of an inch; an A4 page is about 595 by 842 points) measured from the lower left corner of the page, where X and Y are 0. |
| Font size | When it is not ticked, the size of the text is calculated so that the text fits in the box. Tick it to set a fixed size. |
| Right to Left text | Writes the text from right to left (for example for Hebrew or Arabic). |
| Standard fonts, Use a custom font | The text uses a standard PDF font (Helvetica by default). If your text needs letters that the standard fonts do not have (for example Cyrillic, Greek or Chinese), tick Use a custom font and select a font file (.ttf or .fon). |
| Configure Signature Box | What the box contains: Name from digital certificate, Entire certificate subject, Reason, Location and Signing Date (with the Date format). Tick Labels to write a label before each item (Signed By:, Location:, Reason:, Signing Date:); you can change the labels. Tick Custom text to add your own text at the end. |
| Place an image on the signature box | Adds an image (for example a scan of a handwritten signature or the logo of the company): Image and text, Image as background or Image with no text. The image can be a BMP, GIF, JPG, PNG, TIFF or WMF file. |
| Restore Defaults | Puts the settings of this window back to the original values (it asks you to confirm first). |
The reason and the location come from the main window (Signing reason, Signing location). They are saved in the signature, and they appear in the box only when Reason and Location are ticked here. The date is the time of the computer; for a time proved by an independent server use a format with a time stamp (section 7.3).
If you do not want any drawing on the page, untick Visible signature box in the main window. The documents are signed all the same, and the signature appears in the signature panel of the PDF reader.
10. Reason, certification and encryption
Signing reason and location
In the main window, Signing reason offers five usual reasons: I am the author of this document, I have reviewed this document, I am approving this document, I attest to the accuracy and authenticity of this document and I agree to specified portions of this document. You can also type your own reason. Signing location is the place where you sign, for example the name of your city. Both are optional. They are saved in the signature and appear in the signature properties of the PDF reader; they appear in the signature box too, if the options Reason and Location are ticked in the appearance window (section 9). The same reason and location are used for all the documents signed in one operation.
Certify the documents
When you certify a document, you indicate that you are its author and that you approve of its content. You also set which changes are still allowed for the document to remain certified. According to the PDF standard, a certifying signature must be the first signature of a document, and a document can have only one: use Certify only for documents that are not signed yet. PDF readers show a certifying signature with a blue ribbon in the signature panel.
Tick Certify in the main window and choose the level:
| Level | What the recipients can still do |
|---|---|
| No changes allowed | Nothing: any change, also another signature, makes the certification invalid. |
| Permit annotations and form filling | They can fill in the form fields, add comments and sign. |
| Permit form filling | They can fill in the form fields and sign. |
Certification is for the author of a document that others will complete or sign. For invoices, contracts and other documents that you simply sign or seal, leave Certify unticked.
Encrypt the signed documents
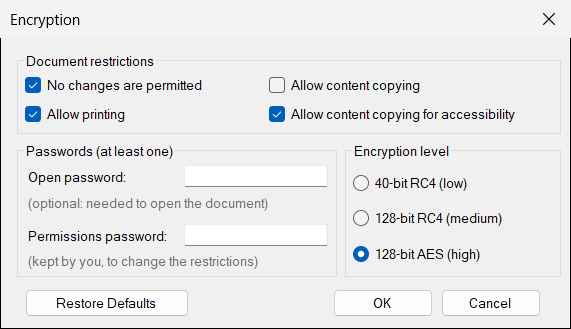
If you want to protect the signed documents, for instance to prevent the copying of their content, you can encrypt them. Tick Encrypt document: the encryption window opens (it opens by itself when no password is set yet), and the documents are signed and encrypted in the same operation, so the signature stays valid. If you close the window without a password, the option is unticked.
| Setting | Meaning |
|---|---|
| No changes are permitted | The recipients cannot modify the document (form filling and document assembly are switched off). Printing and copying are separate settings. |
| Allow printing | The recipients can print the document. It is ticked in the original settings, so that an invoice can be printed. |
| Allow content copying | The recipients can copy the text and the images of the document. |
| Allow content copying for accessibility | The programs that read the document aloud for people with a visual impairment can read it. It is ticked in the original settings. |
| Open password (optional) | The password that the recipients must type to open the document. If you leave it empty, everybody can open the document. |
| Permissions password | The password that you keep, to change the restrictions later. The recipients do not need it. It is also the password with which PDF Signer Server or another program can modify or sign the document again (section 11). |
| Encryption level | 128-bit AES (high) is the default and the recommended one. The two RC4 levels are weaker; use them only if the recipients have very old PDF readers. |
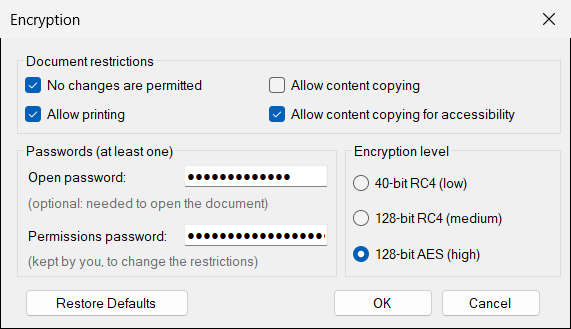
At least one of the two passwords is required, and they must be different (with the same password, the recipients could remove the restrictions). The open password is asked by the PDF reader when the document is opened; the restrictions are shown in the security settings of the document.
- The restrictions (print, copy) are respected by the PDF readers, but they are not a strong protection: only the open password really prevents the opening of a document.
- Encrypt document cannot be combined with PAdES-B-LT or PAdES-B-LTA (section 7.3): select PAdES-B-T or do not encrypt.
- A document that already has signatures cannot be encrypted by PDF Signer Server, because encrypting it would invalidate them. Encrypt it when you sign it the first time.
- Write the passwords down in a safe place. A document encrypted with a password that is lost cannot be recovered.
11. Protected, damaged and already signed documents
Documents protected with a password
Some PDF documents are protected with a password. To sign such a document, tick Owner password of encrypted PDFs in the main window and type the password. It must be the owner password (the permissions password): signing changes the document, and only the owner password allows it. The password that only opens the document is not enough. The signed document keeps the protection of the original: the same passwords, the same restrictions and the same encryption.
If the password is missing or wrong, PDF Signer Server does not sign the document and explains why:
- The PDF document is protected with a password and it cannot be opened: the password is not set or it is not correct. Enter the owner password of the document in 'Owner password of encrypted PDFs'.
- The PDF document is protected and it can be signed only with its owner password (the password of the document permissions), not with the password that only opens it. Enter the owner password in 'Owner password of encrypted PDFs'.
The password of the main window is used for all the documents you sign in the same operation. When you sign a folder of documents that have different passwords, the documents with another password are not signed: they are listed at the end of the operation and, in the automatic signing, they are moved to the error folder (section 13.2). Sign them separately, or with another configuration (section 17).
Documents that are already signed
You can sign a document that already has signatures. The new signature is added after the existing ones, which remain valid. Do not use Certify for such a document: a certifying signature must be the first one (section 10).
Documents with a damaged structure
Some PDF documents have a damaged internal structure (a wrong table of the positions of the objects, for example after a faulty export or download). The PDF readers repair such a document silently when they open it, and you do not notice anything. A document like this cannot be signed by simply adding a signature at the end, so PDF Signer Server rebuilds it before signing:
- A damaged document that has no signature is rebuilt and signed, without any question. The content of the pages does not change, and a protected document keeps its passwords and permissions.
- A damaged document that is already signed can be signed only after the rebuild, and the rebuild makes the existing signatures invalid. PDF Signer Server asks you first and explains it. The default answer is No.
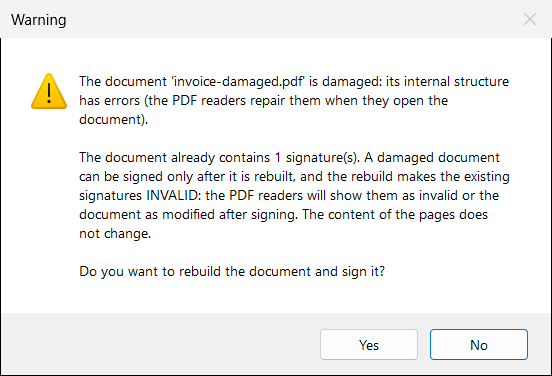
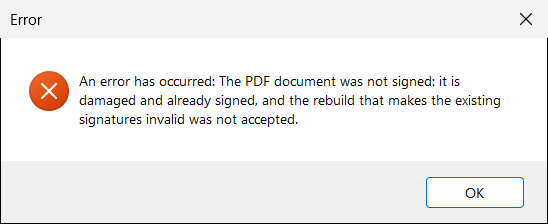
When a folder is signed from the window, the question is asked for each such document, and a document for which you answer No is listed among the errors at the end. When nobody can answer the question — in the automatic signing (section 13) and in the command line (section 18) — these documents are not signed: with the automatic signing they go to the error folder, and the command line returns the result code 1.
12. Signing all the documents of a folder
To sign all the PDF documents of a folder at once, select A folder with PDF documents.
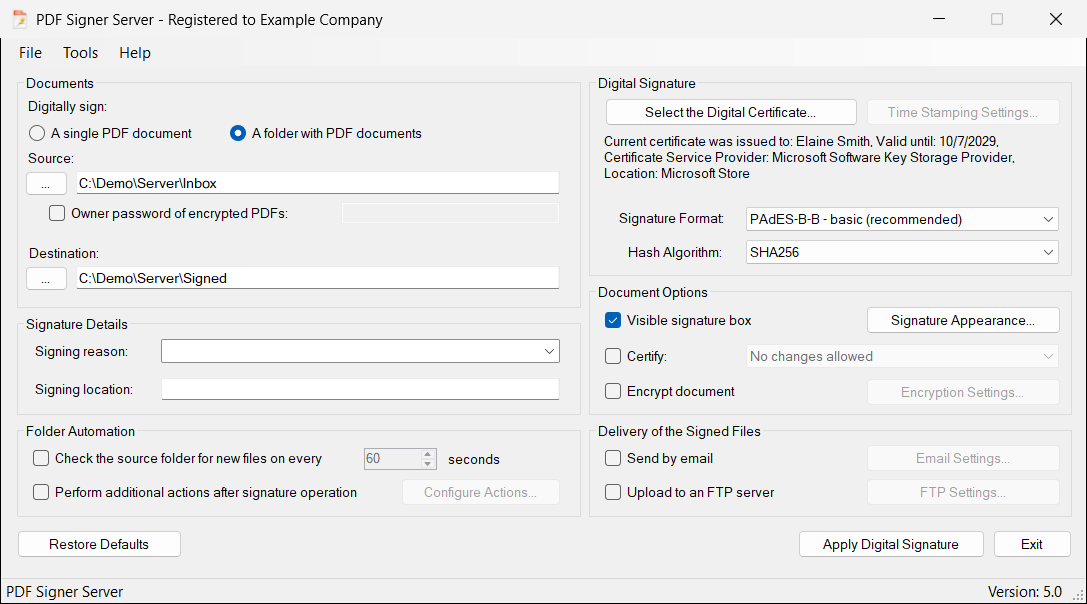
- Under Source choose the folder with your documents (or drag the folder onto the window). The status bar shows how many PDF documents it contains.
- Under Destination choose another folder, which must exist. Every PDF document of the source folder is signed and saved in the destination folder with the same name:
invoice-001.pdfremainsinvoice-001.pdf. The source and the destination must be different folders, otherwise the originals would be overwritten. Only the documents of the folder itself are signed, not those of its subfolders. - Click Apply Digital Signature. While it works, the bottom bar shows the progress and a Cancel button, which stops the operation after the current document. When it finishes you see how many documents were signed.
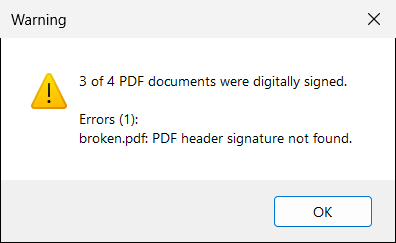
A problem with one document does not stop the others. At the end the message lists the documents that failed and why (the first ten). If the PIN of your smart card is rejected, the operation stops at once, so the card is not locked by repeated wrong attempts.
If you pick a destination folder that already contains PDF documents, you are asked whether to use it anyway. Before the signing starts, you are told how many documents of the destination have the same names as the documents to sign and will be overwritten, and you can stop. For a single document you are asked before an existing destination file is replaced. If the source folder contains no PDF documents, you are told: The selected folder does not contain PDF documents.
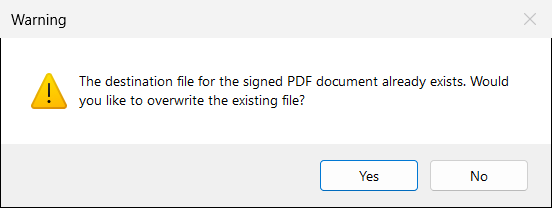
In the folder mode the signed documents have the same names as the originals. When the signing runs automatically (section 13), nothing is asked: a signed document with the same name already present in the destination is replaced.
13. Automatic signing: watching a folder
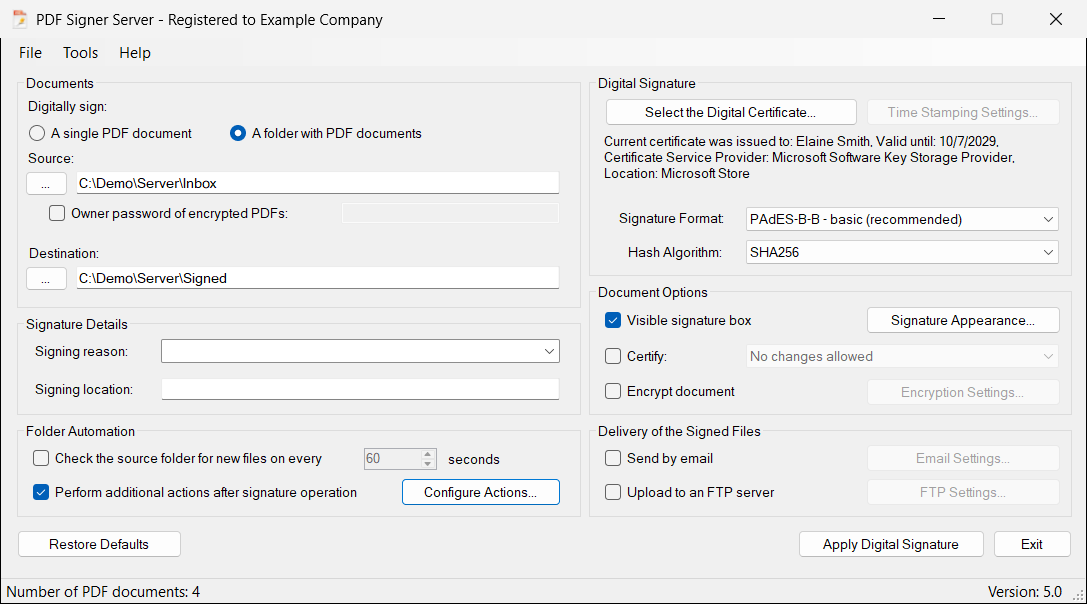
The Folder Automation group turns PDF Signer Server into a signing station. You choose a source folder, where the documents arrive (from your accounting program, from a scanner, from your colleagues), and a destination folder, where the signed documents are saved. The program looks in the source folder at the interval you set and signs every PDF document it finds, without anybody clicking anything.
13.1 Set up the automatic signing
- Choose the folders. Select A folder with PDF documents, and choose the Source folder and the Destination folder. Both must exist and they must be different folders (section 12).
- Choose the certificate and the options. Select the certificate, the signature format, the appearance and the other options as for any signing. Because nobody will be there to answer questions, use a certificate that does not need any interaction: a PFX file, a certificate whose smart card PIN is saved (section 6.2), or a PKCS#11 device (section 6.3). The smart card or the token must stay connected.
- Set the additional actions. Tick Perform additional actions after signature operation, click Configure Actions... and choose the backup folder, the error folder and whether the originals are deleted. This step is important: read section 13.2 first.
- Switch the checking on. Tick Check the source folder for new files on every and set the interval in seconds (from 1 to 9999; 60 is the original value).
- Leave the program running. The status bar shows when the next check will be made. You can minimize the window.
What the program does at every check
- The first check is made when the interval has passed after you switch the checking on. To sign at once, click Apply Digital Signature.
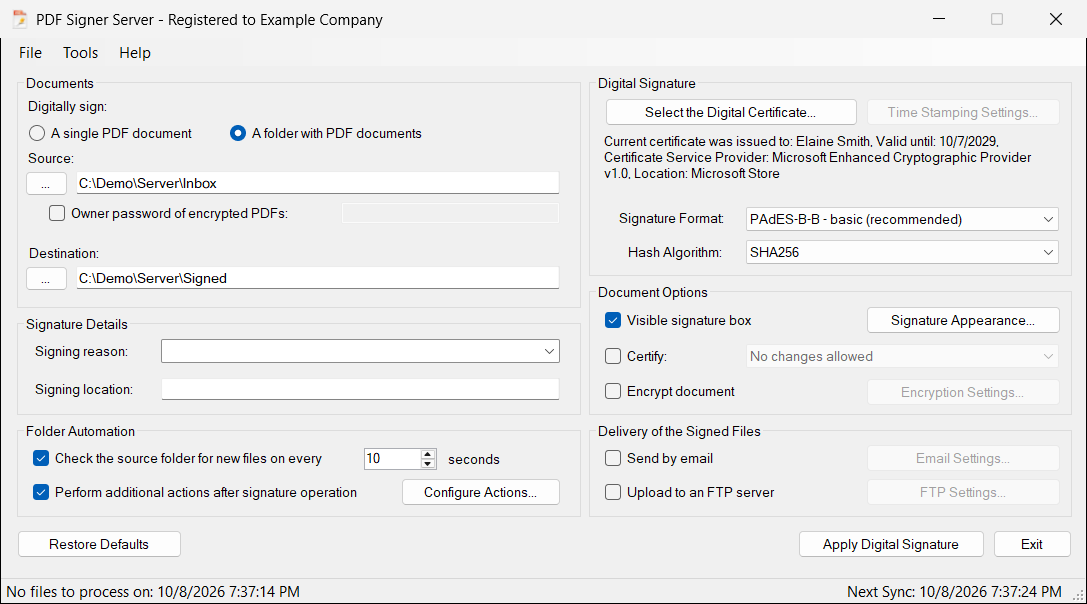
- If the source folder contains no PDF documents, the status bar says No files to process on: and the time.
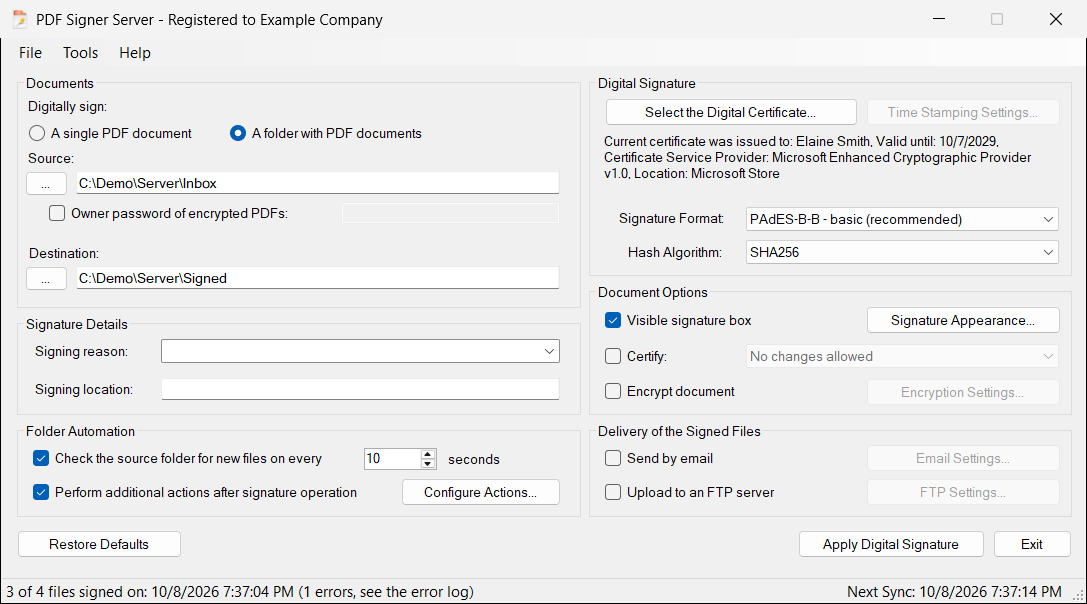
- Otherwise every PDF document of the folder is signed and saved in the destination folder, and then delivered and archived as you chose (section 14, section 13.2). While the program works, the controls of the window are locked.
- The status bar tells the result, for example 3 of 4 files signed on: the date and the time, and (1 errors, see the error log) if some documents failed.
- No message windows are shown for the problems of the documents: they are written in the error log (section 17.1), and the documents are moved to the error folder if you set one.
- To stop the automatic signing, untick Check the source folder for new files, or close the program.
- If the PIN of the smart card or of the PKCS#11 device is rejected, the program shows a message and switches the checking off, so that your device is not locked by repeated wrong PINs (section 6.2).
- If you click Cancel in the bottom bar while the documents are signed, the checking is switched off.
- If the checking cannot start because the settings are not right (for example the certificate is not available, because the token was removed, or the destination folder does not exist), the program shows a warning and writes the reason in the error log. Correct the problem; the next check is made at the usual time.
PDF Signer Server is a normal program with a window, not a Windows service: it signs only while it is running, in a Windows session that is open. Start it with the account that owns the certificate, and keep the session open (the computer can be locked). To start the program every time you sign in to Windows, put a shortcut to it in the Startup folder of that account. If you prefer a program that starts, signs and closes, use the command line with the Windows Task Scheduler (section 18); the command line signs, sends the e-mails, uploads to FTP and applies the additional actions, but it does not watch a folder.
A document that is still being written when the check is made cannot be read, and it is treated as an error. The safest way is that the other program (or the other person) writes the document in a different folder, and moves it into the source folder when it is complete: moving a file inside the same disk is instantaneous.
Before you use real documents, set everything up with a few copies of your documents in test folders, wait for one check, and look at the destination folder, at the backup and error folders and at the logs. Then change the folders to the real ones.
13.2 Additional actions: archive, errors, delete
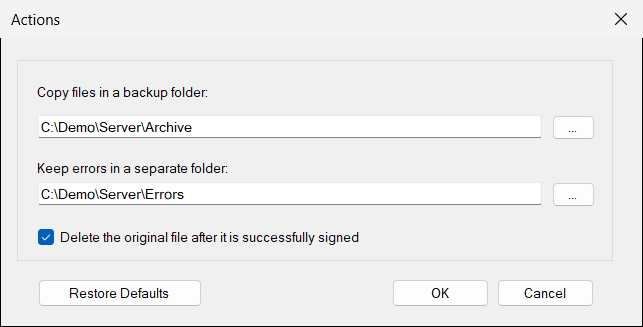
Tick Perform additional actions after signature operation and click Configure Actions... to open the Actions window. The actions work in the folder mode (the button is not available for a single document), also when you click Apply Digital Signature yourself, and in the command line.
| Setting | What it does |
|---|---|
| Copy files in a backup folder | After a document is signed successfully, the original document (the unsigned one) is copied to this folder. A file with the same name that is already in the backup folder is replaced, without asking. |
| Keep errors in a separate folder | A document that cannot be signed (it is not a valid PDF document, it is protected with another password, it is damaged and already signed, the certificate does not work...) is moved to this folder, and the reason is written in the error log. If you do not set an error folder, the document stays in the source folder. |
| Delete the original file after it is successfully signed | The original document is deleted from the source folder after it was signed (and copied to the backup folder, if you set one). |
The two folders must exist: the window checks them when you click OK. Restore Defaults empties the settings of this window.
When the source folder is checked every few seconds, a document that stays in the source folder is found at every check and signed again, and the signed document in the destination is replaced each time. To process every document once, tick Delete the original file after it is successfully signed, and keep the originals in a backup folder. The program warns you when you switch the checking on without this setting: For the same reason set an error folder: a document that cannot be signed would otherwise be tried, and would fail, at every check, and the error log would grow.
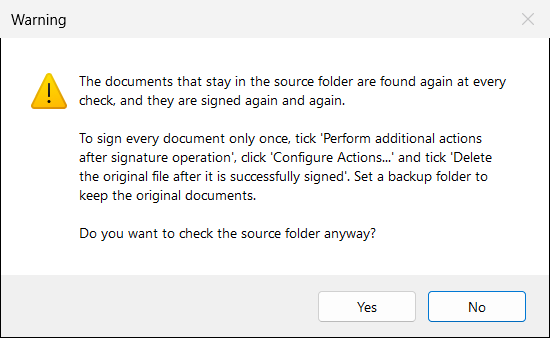
If you tick Delete the original file... and you do not set a backup folder, the original unsigned documents are removed from the source folder and only the signed documents remain, in the destination folder. Set a backup folder if you want to keep the originals.
The recommended combination for a station that works every day:
| Folder | Content |
|---|---|
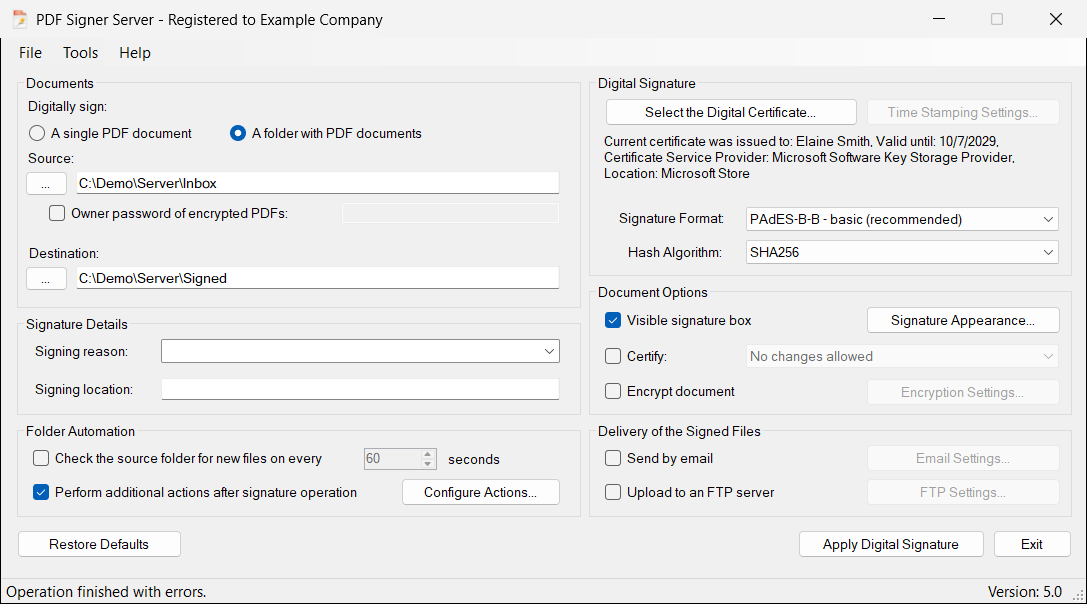
Source (C:\Demo\Server\Inbox) | Empty after every check: the documents that arrive wait here only until the next check. |
Destination (C:\Demo\Server\Signed) | The signed documents. |
Backup (C:\Demo\Server\Archive) | A copy of every original document that was signed. |
Error (C:\Demo\Server\Errors) | The documents that could not be signed. Look here from time to time; the reason of every document is in the error log. |
The order of the work for one document is: the document is signed and saved in the destination folder; it is sent by e-mail and uploaded to the FTP server, if you set these options; then it is copied to the backup folder and deleted from the source folder. A problem of the e-mail or of the FTP does not undo the signing: the signed document stays in the destination folder, the problem is written in the error log, and the original is archived and deleted as usual.
14. Delivery of the signed files: e-mail and FTP
PDF Signer Server can send every signed document by e-mail, and upload it to an FTP server. Tick Send by email and/or Upload to an FTP server in the group Delivery of the Signed Files, and click the button next to each of them to set the details. The delivery works for a single document and for the documents of a folder, with the automatic signing and with the command line too (section 18).
14.1 Sending the signed documents by e-mail
You need an outgoing mail (SMTP) server that your computer can reach, and its settings: ask your system administrator or your mail provider. Each signed document is sent as an attachment of its own message.
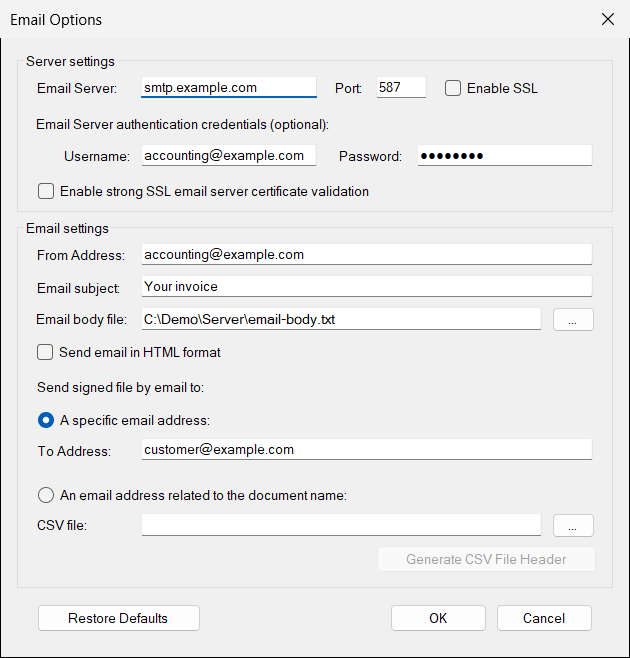
| Setting | Meaning |
|---|---|
| Email Server and Port | The name of the outgoing mail server and its port (587 by default). |
| Enable SSL | Protects the connection with the server (the method named STARTTLS, normally used with port 587). Use the settings your provider gives you. The older method with a separate secure port (usually 465) is not supported. |
| Username, Password | The access data of the mail server. They are optional: leave them empty if the server does not ask for authentication. |
| Enable strong SSL email server certificate validation | Tick it only if the certificate of your mail server is valid: issued by a well known certification authority, not expired, and issued for the name of the server. When it is ticked and the certificate of the server is not trusted, the sending fails. When it is not ticked, problems of the certificate of the server are ignored: do it only for a server that you trust, for example the mail server of your own company. |
| From Address | The sender of the messages. It must be a valid address. |
| Email subject | The subject of the messages (the same for all the documents). |
| Email body file | A text file whose content is the text of the messages, for example Your invoice is enclosed in this message. Click ... to select it. |
| Send email in HTML format | Tick it if the body file contains HTML. Otherwise the text is sent as plain text. |
| Send signed file by email to | A specific email address (To Address): all the documents go to the same recipient. Or An email address related to the document name: a CSV file tells which document goes to which recipient (section 14.2). |
| Restore Defaults | Puts all these values back to the original ones. |
When you click OK, the program checks the values (for example Email Server cannot be empty., From Address format is invalid., The email body file does not exist.) and tells you what to correct.
14.2 A different recipient for every document: the CSV file
Choose An email address related to the document name when the documents of one operation go to different persons, for example one invoice for each customer. The recipient is found in a CSV file (a plain text file with the values separated by commas), by the name of the document.
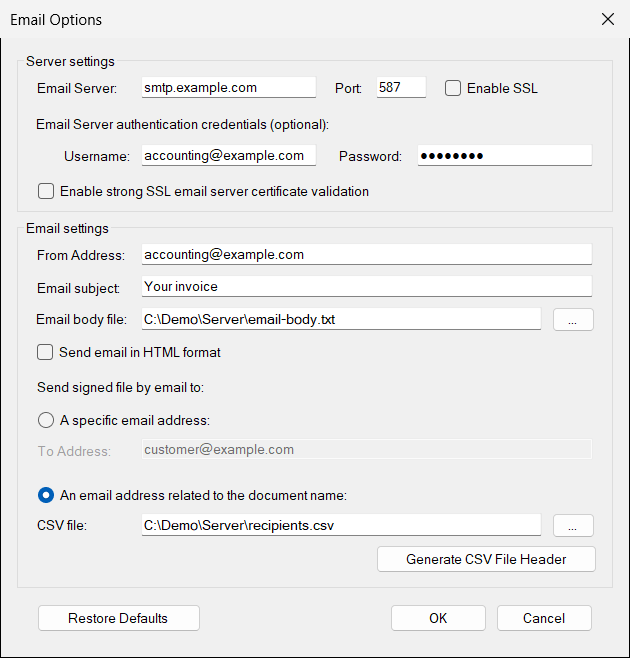
Click Generate CSV File Header and save the file: it contains a header line and some example lines, which you replace with your own lines. A file for three customers looks like this:
FileNamePrefix,EmailAddress,Comments
"invoice-001","northwind@example.com","invoice-001.pdf goes to Northwind"
"invoice-002","contoso@example.com","invoice-002.pdf goes to Contoso"
"invoice-","accounting@example.com","all the other invoices"- The first line is a header and it is not used. Keep it.
- The first column is the name of the document, or only its beginning: a line applies to every document whose name starts with this text (the capital letters do not matter).
invoice-001applies toinvoice-001.pdfand toinvoice-0010.pdftoo; writeinvoice-001.pdfto apply only to that document. - The second column is the address of the recipient. The third column is only a comment for you.
- The lines are read from the top and the first line that fits is used. Write the specific lines first and the general lines (like
invoice-) last. - Save the file as a plain text (CSV) file; a Microsoft Excel file (
.xls,.xlsx) cannot be used: in Excel choose Save As and the CSV format.
When you select the file, the program tells you how many lines it found, and it checks the addresses. With this file, the documents of the folder are sent like this:
| Signed document | Is sent to |
|---|---|
invoice-001.pdf | northwind@example.com |
invoice-002.pdf | contoso@example.com |
invoice-003.pdf | accounting@example.com (the line invoice-) |
receipt-001.pdf | nobody: no line fits |
When no line of the CSV file fits a document, the document is still signed (and uploaded to the FTP server, if you set it), but it is not sent, and you are not told on the screen: the reason, Recipient email address was not found on the CSV file., is only written in the error log. The same is true for the other problems of the sending with a CSV file. Look at the error log after the first operation (section 17.1). With A specific email address the problems of the sending are shown to you in the window.
14.3 Uploading the signed documents to an FTP server
After a document is signed it can also be uploaded to an FTP account. If you use both options, the document is sent by e-mail first and then uploaded.
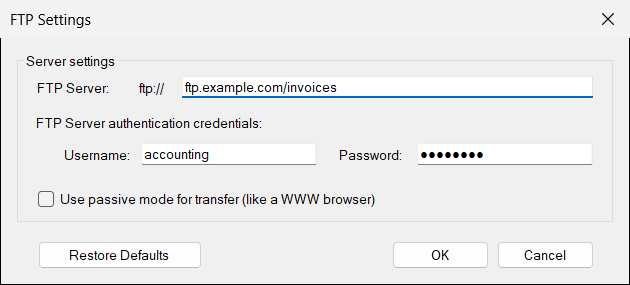
| Setting | Meaning |
|---|---|
| FTP Server | The name of the server, after the fixed text ftp://, optionally followed by the port and the folder: ftp.example.com, ftp.example.com:2121, ftp.example.com/invoices. The document is uploaded under its own name, in that folder. |
| Username, Password | The access data of the FTP account. |
| Use passive mode for transfer (like a WWW browser) | Tick it when the computer is behind a firewall or a router, which is the usual case: the connection for the data is then opened by your computer, like in a web browser. If the upload fails with the passive mode off, try with it on. |
- The folder must already exist on the server.
- If a file with the same name exists on the FTP account, it is replaced without any notice.
- This is the plain FTP protocol: the access data and the documents are not encrypted on the way. SFTP and FTPS are not supported; use the upload only in networks that you trust.
If the delivery fails
The signing and the delivery are separate steps: when the e-mail or the FTP fails, the document is signed anyway and the signed file stays in the destination folder. For a single document, a message tells you what failed:
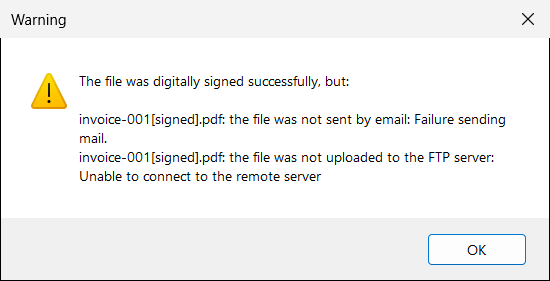
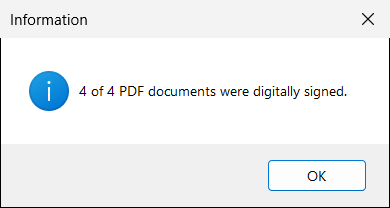
For a folder, the errors are listed in the final message and written in the error log. The window shows, for a folder signed without errors, a message like the following:
15. Checking a signed document
In PDF Signer Server: Document Properties
Open File → Document Properties.... If a document is selected in the Source box, it is shown; otherwise the program asks you to select one. The window shows the number of pages, the size of the page and, for each signature of the document (choose it from the list; the ... button next to the list shows the certificate of the signer): the reason and the place of the signature, the hash algorithm, the integrity of the signature, the date and the time stamp server.
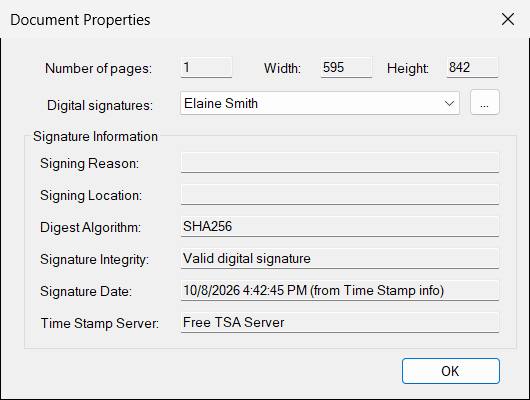
| Line | Meaning |
|---|---|
| Signature Integrity | The most important line. Valid digital signature means that the document is exactly as it was when it was signed. Invalid digital signature means that it was changed after signing, or that the signature is damaged. |
| Signature Date | When the document was signed. (from Time Stamp info) means that an independent server proves the time. (Computer Time) means that the time comes from the clock of the computer that signed. |
| Time Stamp Server | The authority that issued the time stamp, or not available when there is no time stamp. |
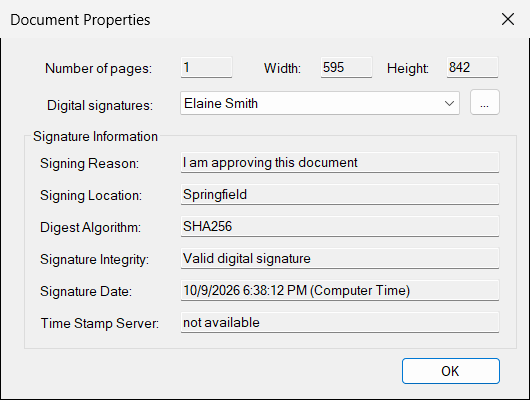
This window checks only that the document was not changed. Whether you trust the signer (and whether the signature is a qualified one) is decided by checking the certificate: do it in Adobe Reader or with the European validator (section 7.4).
For a document that is protected with a password, tick Owner password of encrypted PDFs in the main window and type the password before you open the properties.
In Adobe Reader
Open the signed document in Adobe Reader and look at the bar above the document and at the Signatures panel. For a certificate that is not in the lists that Adobe trusts, for example the certificate of your company or a test certificate, Adobe says that the validity is unknown:
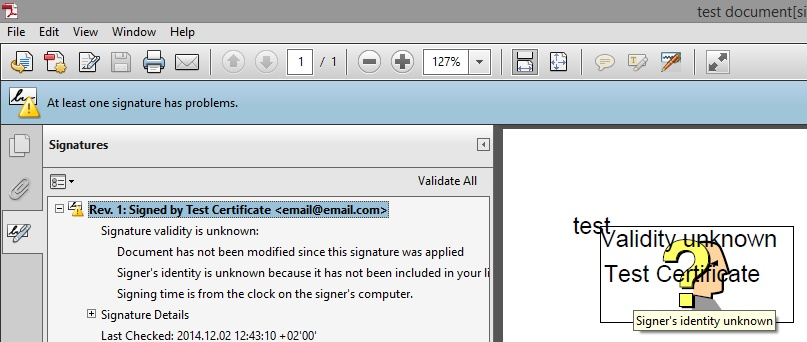
This is not an error of the signature or of PDF Signer Server: Adobe uses its own lists of trusted authorities. A signature made with a qualified certificate, or with a certificate of an authority that Adobe trusts, is shown as valid without any setting. For the other certificates, the person who receives the document can tell Adobe that it trusts the certificate:
- Open the Signature Properties and click Show Certificate....
- Select the topmost certificate of the chain, open the Trust tab and click Add to Trusted Identities....
- Tick all the boxes, click OK, and open the document again.
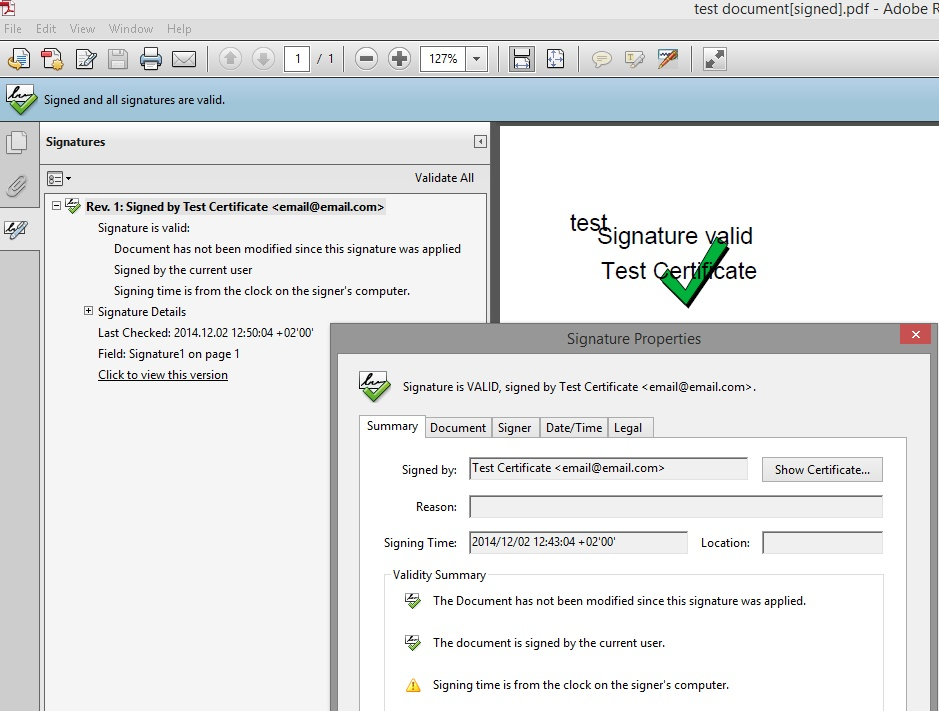
The steps for the different versions of Adobe Reader, the time stamps and the revocation checks are described in the guide Validating Digital Signatures in Adobe.
With the European validator
To check the level of the signature (advanced or qualified), use the validation tool of the European Commission, described in section 7.4.
16. Creating a test certificate
If you do not have a certificate yet and only want to try the program, PDF Signer Server can create a self-signed one. Open Tools → Create a self-signed Certificate... (or click the same button in the certificate window).
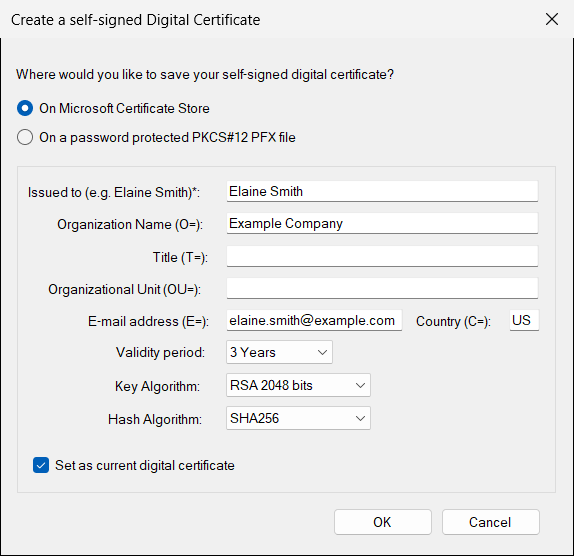
- Choose where to save it: On Microsoft Certificate Store (the certificate is installed for your Windows account) or On a password protected PKCS#12 PFX file (you will be asked for the file name and a password).
- Type Issued to (the name, required) and, if you wish, the organization, the title, the unit, the e-mail address and the country code (two letters, for example
US). - Choose the Validity period (3, 5 or 10 years, default 3 years), the Key Algorithm (RSA 2048, 3072 or 4096 bits, or ECDSA with the curves P-256, P-384 or P-521; default RSA 2048) and the Hash Algorithm (SHA256, SHA384 or SHA512; default SHA256). The defaults are fine.
- Keep Set as current digital certificate ticked to use it right away, then click OK and confirm the question that explains what a self-signed certificate is.
Nobody except you trusts a self-signed certificate. Other people's programs will show that the signer is unknown. For real documents, use a certificate issued by a recognised certification authority (section 7.2).
17. Saving your settings, and the logs
The program remembers your choices (certificate, signature format, appearance, time stamp server, encryption, e-mail, FTP, folders, actions...) the next time you start it. You can also keep several sets of settings in files — for example one for each customer or each department:
- File → Save Configuration (Ctrl+S) saves the current settings now. They are also saved when you close the program.
- File → Save Configuration As... saves the current settings in an XML file you name.
- File → Load Configuration... loads them again.
- Restore Defaults (the button of the main window and the command of the Tools menu) returns everything to the original values: the selected certificate, the appearance of the signature, the time stamp server, the e-mail, the FTP and the actions too. The program asks you to confirm first.
The settings are kept in the file configuration.xml, in the folder %APPDATA%\Secure Soft\PDF Signer Server\5.0 of your Windows account. A saved configuration file is also what the command line uses to sign documents automatically.
A configuration file can contain the PIN of your token, the password of your PFX file, the passwords of the e-mail and of the FTP accounts and the other passwords you typed, in encrypted form. Do not send your configuration files to other people, and keep them in a folder that only the administrators can read.
If a configuration file contains a value that is not valid, the program tells you which one and uses the default value instead. A file that is damaged, or that is not a PDF Signer Server configuration file, is never used: a damaged current configuration is kept as configuration.xml.bad and the default one is created, and when you load a file that is not valid, your current configuration is not changed.
17.1 The logs
PDF Signer Server writes everything it does in two text files, in the same folder as the configuration, %APPDATA%\Secure Soft\PDF Signer Server\5.0:
log.txt— every document that was signed, sent by e-mail, uploaded, archived, moved to the error folder or deleted;errorlog.txt— the errors, with the reason.
To read them, use Tools → Show Application Log... and Show Application Error Log...: they open in your text editor. Every line starts with the date and the time (in the format of your Windows settings), followed by the message. The command line writes in the same files. An example of log.txt:
10/8/2026 7:37:04 PM:The file C:\Demo\Server\Inbox\broken.pdf cannot be processed and was saved on the error folder C:\Demo\Server\Errors. Error message: PDF header signature not found.
10/8/2026 7:37:04 PM:The source file C:\Demo\Server\Inbox\broken.pdf was deleted
10/8/2026 7:37:04 PM:The file C:\Demo\Server\Inbox\invoice-001.pdf was signed and the resulting signed file is C:\Demo\Server\Signed\invoice-001.pdf
10/8/2026 7:37:04 PM:The file C:\Demo\Server\Inbox\invoice-001.pdf was saved as backup to the folder C:\Demo\Server\Archive
10/8/2026 7:37:04 PM:The source file C:\Demo\Server\Inbox\invoice-001.pdf was deleted
and of errorlog.txt, for the same operation:
10/8/2026 7:37:04 PM:The file C:\Demo\Server\Inbox\broken.pdf cannot be signed. Error message: PDF header signature not found.The delivery adds lines like The file C:\Demo\Server\Signed\invoice-001.pdf was sent by email to the email address: northwind@example.com and The file C:\Demo\Server\Signed\invoice-001.pdf was uploaded to the FTP server ftp.example.com/invoices.
The program only adds lines to the log files. If the computer signs many documents, archive or delete the files from time to time (close the program first, or just rename the files: new ones are created).
18. Automatic signatures from the command line
PDF Signer Server can also sign without showing its window, for example from a scheduled task, from a script or from another program. Nobody has to click anything: the program reads the settings from a configuration file, signs and closes.
By default, PDF Signer Server is installed in the folder C:\Program Files (x86)\Secure Soft\PDF Signer Server (on a 32-bit Windows: C:\Program Files\Secure Soft\PDF Signer Server) and the program file is PDF Server.exe.
The command line starts, signs the documents that exist now, delivers them (e-mail, FTP) and applies the additional actions, as the configuration file says, and closes. To keep watching a folder, use the window with the folder automation (section 13).
Command line parameters
"PDF Server.exe" <source file> <destination file> [<configuration file>]
"PDF Server.exe" <source folder> <destination folder> [<configuration file>]- source folder: all the PDF documents of the folder are signed, with the same names, in the destination folder. The destination folder must exist.
- configuration file: an XML file saved with File → Save Configuration As.... When it is not given, the current configuration of your Windows account is used.
- A fourth parameter, used by earlier versions of the program, is ignored.
- Do not end a path written between quotes with a backslash: write
"C:\Folder", not"C:\Folder\". Windows would read the last backslash and quote as one character and the parameters would be mixed up. - An error on one document of a folder does not stop the other documents.
- If the configuration sets the e-mail and the FTP upload (section 14), every signed document is sent and uploaded, for a document and for a folder. With a CSV file of recipients, the file is checked before anything is signed.
- For a folder, the additional actions of the configuration (backup folder, error folder, delete the originals, section 13.2) are applied; for a single document they are not.
Sign one document
c:\Program Files (x86)\Secure Soft\PDF Signer Server>"PDF Server.exe" C:\Demo\Server\Inbox\invoice-001.pdf C:\Demo\Server\Signed\invoice-001.pdf
The file was digitally signed successfully.
Sign a folder
c:\Program Files (x86)\Secure Soft\PDF Signer Server>"PDF Server.exe" C:\Demo\Server\Inbox C:\Demo\Server\Signed
The PDF documents of the source folder were digitally signed successfully. Number of signed documents: 3
Custom configuration
In some cases you need a different signature configuration (for example a different certificate, signature format or appearance, or different actions) for different documents or folders. To save a specific configuration, open the window, set everything you want, and go to File → Save Configuration As... Save the configuration in a file. Later you can use that file in the command line to apply a different configuration:
"PDF Server.exe" C:\Demo\Server\Inbox C:\Demo\Server\Signed C:\Demo\Server\server.configWith a configuration that has a backup folder, an error folder and the deletion of the originals, and a folder that contains a document that is not a valid PDF, the result is:
Operation finished with errors. Signed files: 2 of 3. Last error: PDF header signature not found. File name: broken.pdfThe two documents that are valid are signed in the destination folder and archived, and the third one is moved to the error folder.
When the delivery fails, the document is signed anyway, the message tells what failed and the result code is 1:
The file was digitally signed successfully, but:
invoice-001.pdf: the file was not sent by email: Failure sending mail.Because nobody is there to answer, choose a certificate that does not need any interaction: a PFX file (its password is saved in the configuration, encrypted), a smart card certificate with the PIN saved (section 6.2), or a PKCS#11 device (section 6.3); the smart card must be connected. The certificate must be valid: an expired certificate stops the signing, with the result code 2. A document that is protected with a password is signed if its owner password is saved in the configuration (section 11), and a damaged document that is already signed is not signed (it needs your answer to a question).
Result codes
| Code | Meaning |
|---|---|
| 0 | Success. |
| 1 | The signing or the delivery failed (for a folder: at least one document failed). |
| 2 | The signing could not start: invalid parameters, the source does not exist, the destination is the same as the source, the configuration file is damaged or has values that are not valid, the certificate is not valid, or PDF Signer Server is not registered (the trial has expired). |
The messages are written in the command window. Examples:
Command line options: PDF Server.exe <source file | folder> <destination file | folder> [<XML configuration file>]      (code 2)
The source file or folder does not exist.                       (code 2)
The destination folder does not exist.                         (code 2)
The destination cannot be the same as the source.               (code 2)
The configuration file does not exist.                        (code 2)
The configuration file contains values that are not valid (C:\Demo\Server\invalid.config):
SignatureFormat: 'PAdES-BB' is not valid (valid values: PAdES-B, PAdES-T, PAdES-LT, PAdES-LTA, PKCS7, PKCS7-T, PKCS7-LTV).    (code 2)
The configuration file cannot be read: it is damaged, or it is not a PDF Signer Server configuration file (C:\Demo\Server\notxml.config). ...    (code 2)
An encrypted document cannot be signed with the PAdES-B-LT - long term validation signature format: ... Select the PAdES-B-T signature format, or do not encrypt the document.    (code 2)
Operation finished with errors. Signed files: 2 of 3. Last error: ...    (code 1)
PDF Signer Server is a Windows application, so the command prompt does not wait for it. To wait and read the result code:
cmd:         start "" /wait "PDF Server.exe" C:\Demo\Server\Inbox C:\Demo\Server\Signed C:\Demo\Server\server.config
             echo %errorlevel%

PowerShell:  (Start-Process "PDF Server.exe" -ArgumentList '"C:\Demo\Server\Inbox" "C:\Demo\Server\Signed" "C:\Demo\Server\server.config"' -Wait -PassThru).ExitCode
Every signed document, and every error, is also written in the log files (section 17.1).
Set up everything once in the window, use Save Configuration As..., and then create a task in the Windows Task Scheduler that starts PDF Server.exe with the source folder, the destination folder and the configuration file. Use the same Windows account for the task that you used to set up the certificate and the registration, and, if the certificate is on a smart card or on a token, choose that the task runs only when this user is logged on.
19. The Signature Library behind PDF Signer Server
PDF Signer Server is an application built on the Signature Library (SignLib), a library for .NET that creates and verifies digital signatures: PDF (PAdES), CAdES / PKCS#7, XML (XAdES), Office and more. The signing that PDF Signer Server does is available to your own programs and scripts through the library:
- Library page: https://www.signfiles.com/signature-library/
- Download (library, samples and PowerShell scripts): https://www.signfiles.com/sdk/SignatureLibrary.zip
- Code samples: sign a PDF document, automatic signature (bypass the PIN), PowerShell
The library works with Windows PowerShell, C#, VB.NET and ASP.NET, and it supports certificates from PFX files, from the Windows store and from smart cards, USB tokens and HSMs.
PDF Signer Server is also a demonstration of the library. Before you write any code, use the window to try a signature format, a hash algorithm, a time stamp server or a certificate, and save the result of your test. Every choice you make in the window is one property of the library (see the table below), and the signed document you get is what your code will produce.
From the window to the code
PDF signatures are created with the class SignLib.Pdf.PdfSignature. The table shows what each setting of PDF Signer Server is in the library.
| In PDF Signer Server | In the library |
|---|---|
| Signature Format (section 7.3) | ps.SignatureStandard = PdfSignatureStandard.Pades (PAdES-B-B), PadesLT (PAdES-B-LT), PadesLTA (PAdES-B-LTA), Default (the older PKCS#7). PAdES-B-T is Pades with a time stamp server: the time stamp is added when TimeStamping.ServerUrl is set. The PKCS#7 format with revocation info is Default with ps.PadesLtvLevel = PadesLtvLevel.IncludeCrlAndOcsp. |
| Hash Algorithm | ps.HashAlgorithm = HashAlgorithm.SHA256 (or SHA384, SHA512) |
| Digital certificate from a PFX file | DigitalCertificate.LoadCertificate(pfxFile, password) |
| Digital certificate from the Windows store or a smart card | DigitalCertificate.LoadCertificate(...) with a search criterion, or without parameters to show the selection window |
| Smart Card PIN | DigitalCertificate.SmartCardPin = "..." |
| A device through PKCS#11 (section 6.3) | The library asks an external signature provider to sign: DigitalCertificate.UseExternalSignatureProvider is set with an object that implements SignLib.Certificates.IExternalSignature. PDF Signer Server implements it with a PKCS#11 library, so the private key stays in the device. |
| Time Stamp Server URL, user name, password, policy, NONCE, hash (section 8) | ps.TimeStamping.ServerUrl, .UserName, .Password, .PolicyOid, .UseNonce, .HashAlgorithm |
| Signing reason, Signing location | ps.SigningReason, ps.SigningLocation |
| Visible signature box, the page, the position (section 9) | ps.VisibleSignature, ps.SignaturePage (int.MaxValue is the last page), ps.SignaturePages, ps.SignatureAppearsOnAllPages, ps.SignaturePosition, ps.SignatureAdvancedPosition |
| Font, text and image of the signature | ps.FontName, ps.FontFile, ps.FontSize, ps.TextDirection, ps.SignatureText, ps.SignatureImage, ps.SignatureImageType |
| Certify | ps.CertifySignature = CertifyMethod.NoChangesAllowed (or AnnotationsAndFormFilling, FormFilling) |
| Encrypt document | ps.Encryption (EncryptionMethod, EncryptionAlgorithm, OwnerPassword, UserPassword, DocumentRestrictions) |
| Owner password of encrypted PDFs | ps.DocumentProperties.Password (set it before LoadPdfDocument) |
| Revocation data maximum size | ps.MaxCrlSize (in bytes) |
| Apply Digital Signature | ps.ApplyDigitalSignature(), which returns the bytes of the signed document |
| Document Properties (section 15) | ps.DocumentProperties (NumberOfPages, DigitalSignatures, IsDamaged) and PdfSignatureInfo |
| Create a self-signed certificate (section 16) | the class X509CertificateGenerator |
| Folder automation, e-mail, FTP, backup and error folders (section 13, section 14) | These are functions of the program, not of the library. In your own code you use the classes of .NET (for example FileSystemWatcher, SmtpClient and FtpWebRequest) around the signing. |
The library can do more than the window: an explicit signature policy, the signing of an existing empty signature field, a document time stamp without a signature, and the deferred signing with an external signer (HSM, cloud). Section 21 shows the main cases.
20. Digitally sign PDF documents using Windows PowerShell
The main functions of PDF Signer Server are available in the SignLib library, which you can download from this link: https://www.signfiles.com/sdk/SignatureLibrary.zip
To digitally sign a PDF document using Windows PowerShell, simply download the library above and inspect the Signature Library\PowerShell Scripts folder. The script below creates a test PFX certificate on the fly, signs the document in the PAdES-B-B format (SHA256) and verifies the result.
The script
Save it as signPdf.ps1, in the same folder with SignLib.dll and iTextSharp-4.1.6.dll.
#digitally sign a PDF document with a PFX certificate created on the fly (PAdES-B-B, SHA256) and verify the result
#the script can be configured to use an existing PFX file or a certificate loaded from the Windows certificate store (smart card certificate)

if ($args.Length -eq 0)
{
    echo "Usage: signPdf.ps1 <unsigned file> <signed file>"
}
else
{
    #SignLib.dll and iTextSharp-4.1.6.dll must be in the same folder as the script
    $DllPath = Join-Path $PSScriptRoot 'SignLib.dll'
    [System.Reflection.Assembly]::LoadFrom($DllPath) | Out-Null

    #create a PFX digital certificate
    $generator = new-object -typeName SignLib.Certificates.X509CertificateGenerator("serial number")
    $pFXFilePassword = "tempP@ssword"
    $generator.Subject = "CN=Your Certificate, E=useremail@email.com, O=Organization"
    $generator.Extensions.AddKeyUsage([SignLib.Certificates.CertificateKeyUsage]::DigitalSignature)
    $generator.Extensions.AddEnhancedKeyUsage([SignLib.Certificates.CertificateEnhancedKeyUsage]::DocumentSigning)

    echo "Create the certificate..."
    $certificate = $generator.GenerateCertificate($pFXFilePassword)

    #digitally sign the PDF document (PAdES-B-B, SHA256)
    $sign = new-object -typeName SignLib.Pdf.PdfSignature("serial number")
    $sign.LoadPdfDocument($args[0])
    $sign.DigitalSignatureCertificate = [SignLib.Certificates.DigitalCertificate]::LoadCertificate($certificate, $pFXFilePassword)
    $sign.SignatureStandard = [SignLib.Pdf.PdfSignatureStandard]::Pades

    $sign.SigningReason = "I approve this document"
    $sign.SigningLocation = "Accounting department"
    $sign.SignaturePage = 1
    $sign.SignaturePosition = [SignLib.Pdf.SignaturePosition]::TopRight

    echo "Perform the digital signature..."
    [System.IO.File]::WriteAllBytes($args[1], $sign.ApplyDigitalSignature())

    #verify the signature
    $verify = new-object -typeName SignLib.Pdf.PdfSignature("serial number")
    $verify.LoadPdfDocument($args[1])
    echo ("Signatures: " + $verify.DocumentProperties.DigitalSignatures.Count)
    echo ("Valid: " + $verify.DocumentProperties.DigitalSignatures[0].SignatureIsValid)
}
How to run it
How to run the Windows PowerShell script from the command line:
powershell -executionPolicy bypass -file d:\signPdf.ps1 d:\invoice.pdf d:\invoice-signed.pdfThe result in the window:
Create the certificate...
Perform the digital signature...
Signatures: 1
Valid: True- Replace
"serial number"with the serial number you received for the library. Without it the library works in demonstration mode: it writes This is a demo version of SignLib.dll. and adds the text SignLib.dll DEMO VERSION on the first page of the documents. -executionPolicy bypassallows this one script to run without changing the security settings of the computer.- To sign with an existing PFX file, remove the certificate generator and use
[SignLib.Certificates.DigitalCertificate]::LoadCertificate("d:\certificate.pfx", "password"). For a smart card certificate from the Windows store use the methods described in section 21.3. - For a time stamp (PAdES-B-T), add
$sign.TimeStamping.ServerUrl = [Uri]"https://your-time-stamp-server"beforeApplyDigitalSignature. For a qualified signature use the qualified certificate of your device, and for a qualified time stamp the server of a qualified provider (section 7).
21. Digitally sign PDF documents using C# or VB.NET
The main functions of PDF Signer Server are available in the SignLib library (download). To digitally sign a PDF document using C# or VB.NET, download the library, add a reference to SignLib.dll in your project, make sure that iTextSharp-4.1.6.dll, delivered with it, is in the same folder as your program, and inspect the sample projects of the package and the code samples: sign a PDF document, automatic signature, PowerShell.
PDF documents are signed with the class PdfSignature (namespace SignLib.Pdf). It creates PAdES and PKCS#7 signatures, with or without a time stamp and long-term validation data, visible or invisible, and it reads the signatures of a document (DocumentProperties.DigitalSignatures). All the examples below use these namespaces. Every example was run with the library to check the result.
using System;
using System.Collections.Generic;   // List<int>
using System.IO;
using System.Security.Cryptography.X509Certificates;
using SignLib;                 // HashAlgorithm
using SignLib.Certificates;    // DigitalCertificate
using SignLib.Pdf;             // PdfSignature, SignaturePosition, PdfSignatureStandard...
21.1 Sign a document and verify the signature
The smallest program: load a certificate from a PFX file, sign, save the signed document and verify it. The signature format is PAdES-B-B (PdfSignatureStandard.Pades) and the hash is SHA256, like the defaults of PDF Signer Server. ApplyDigitalSignature returns the bytes of the signed document: you choose where to save it. The PdfSignature object that verifies is a new one, loaded with the signed document.
// "serial number" is the serial number of the library
PdfSignature ps = new PdfSignature("serial number");
ps.LoadPdfDocument(@"C:\Demo\Invoices\invoice-001.pdf");
ps.DigitalSignatureCertificate = DigitalCertificate.LoadCertificate(@"C:\Demo\elaine.pfx", "123456");

ps.SignatureStandard = PdfSignatureStandard.Pades;      // PAdES-B-B
ps.HashAlgorithm = HashAlgorithm.SHA256;
ps.SigningReason = "I am approving this document";
ps.SigningLocation = "Springfield";
ps.SignaturePage = int.MaxValue;                        // the last page
ps.SignaturePosition = SignaturePosition.BottomRight;

// apply the digital signature: the original document is not changed
byte[] signed = ps.ApplyDigitalSignature();
File.WriteAllBytes(@"C:\Demo\Signed\invoice-001-code.pdf", signed);

// verify the signature
PdfSignature check = new PdfSignature("serial number");
check.LoadPdfDocument(@"C:\Demo\Signed\invoice-001-code.pdf");

Console.WriteLine("Pages: " + check.DocumentProperties.NumberOfPages + ", signatures: " + check.DocumentProperties.DigitalSignatures.Count);
foreach (PdfSignatureInfo info in check.DocumentProperties.DigitalSignatures)
{
    Console.WriteLine("Signer: " + info.SignatureCertificate.GetNameInfo(X509NameType.SimpleName, false));
    Console.WriteLine("Hash: " + info.HashAlgorithm);
    Console.WriteLine("Reason: " + info.SigningReason + ", location: " + info.SigningLocation);
    Console.WriteLine("Valid: " + info.SignatureIsValid);
    Console.WriteLine("Time: " + info.SignatureTime);
    Console.WriteLine("Time stamped: " + info.SignatureIsTimestamped);
}
The result:
Pages: 1, signatures: 1
Signer: Elaine Smith
Hash: SHA256
Reason: I am approving this document, location: Springfield
Valid: True
Time: 10/8/2026 7:04:42 PM
Time stamped: False(X509NameType is in the namespace System.Security.Cryptography.X509Certificates.) The same example in VB.NET:
Imports System
Imports System.IO
Imports System.Security.Cryptography.X509Certificates
Imports SignLib
Imports SignLib.Certificates
Imports SignLib.Pdf

Module Module1
    Sub Main()
        ' "serial number" is the serial number of the library
        Dim ps As New PdfSignature("serial number")
        ps.LoadPdfDocument("C:\Demo\Invoices\invoice-001.pdf")
        ps.DigitalSignatureCertificate = DigitalCertificate.LoadCertificate("C:\Demo\elaine.pfx", "123456")
        ps.SignatureStandard = PdfSignatureStandard.Pades
        ps.HashAlgorithm = HashAlgorithm.SHA256
        ps.SigningReason = "I am approving this document"
        ps.SigningLocation = "Springfield"
        ps.SignaturePosition = SignaturePosition.BottomRight

        'apply the digital signature and save the signed file
        File.WriteAllBytes("C:\Demo\Signed\invoice-001-vb.pdf", ps.ApplyDigitalSignature())

        Dim check As New PdfSignature("serial number")
        check.LoadPdfDocument("C:\Demo\Signed\invoice-001-vb.pdf")
        Console.WriteLine("Signatures: " & check.DocumentProperties.DigitalSignatures.Count)
        For Each info As PdfSignatureInfo In check.DocumentProperties.DigitalSignatures
            Console.WriteLine("Valid: " & info.SignatureIsValid)
        Next
    End Sub
End Module
21.2 Signature formats, time stamp and long term validation
The format is chosen with SignatureStandard, and the signature is time stamped (PAdES-B-T) when you set the address of a time stamp server (section 8):
| Format in PDF Signer Server | In the library |
|---|---|
| PAdES-B-B | PdfSignatureStandard.Pades, without a time stamp server |
| PAdES-B-T | PdfSignatureStandard.Pades and TimeStamping.ServerUrl |
| PAdES-B-LT | PdfSignatureStandard.PadesLT and TimeStamping.ServerUrl |
| PAdES-B-LTA | PdfSignatureStandard.PadesLTA and TimeStamping.ServerUrl |
| PKCS#7 (legacy) | PdfSignatureStandard.Default (with TimeStamping.ServerUrl for the time stamp) |
A signature with time stamp (PAdES-B-T), and its verification:
PdfSignature ps = new PdfSignature("serial number");
ps.LoadPdfDocument(@"C:\Demo\Invoices\invoice-002.pdf");
ps.DigitalSignatureCertificate = DigitalCertificate.LoadCertificate(@"C:\Demo\elaine.pfx", "123456");

ps.SignatureStandard = PdfSignatureStandard.Pades;      // PAdES-B-T: PAdES-B-B plus a time stamp
ps.TimeStamping.ServerUrl = new Uri("https://ca.signfiles.com/TSAServer.aspx");
ps.TimeStamping.UseNonce = true;                        // a random number that protects the request
ps.TimeStamping.HashAlgorithm = HashAlgorithm.SHA256;   // the hash of the time stamp request
// ps.TimeStamping.UserName = "user"; ps.TimeStamping.Password = "password";   // only if the server requires them

File.WriteAllBytes(@"C:\Demo\Signed\invoice-002-code-t.pdf", ps.ApplyDigitalSignature());

PdfSignature check = new PdfSignature("serial number");
check.LoadPdfDocument(@"C:\Demo\Signed\invoice-002-code-t.pdf");
PdfSignatureInfo info = check.DocumentProperties.DigitalSignatures[0];
Console.WriteLine("Time stamped: " + info.SignatureIsTimestamped);
Console.WriteLine("Time stamp authority: " + info.TimestampInfo.TsaCertificate.GetNameInfo(X509NameType.SimpleName, false));
Console.WriteLine("Time stamp altered: " + info.TimestampInfo.IsTimestampAltered);
The result:
Time stamped: True
Time stamp authority: Free TSA Server
Time stamp altered: False
For long term validation, set SignatureStandard to PdfSignatureStandard.PadesLT; the signing adds the certificates and the revocation data of the signer to the document. PdfSignatureStandard.PadesLTA adds, in addition, the document time stamp. The time stamp server can be the server of a qualified time stamp authority (section 7.5).
PdfSignature ps = new PdfSignature("serial number");
ps.LoadPdfDocument(@"C:\Demo\Invoices\invoice-003.pdf");
ps.DigitalSignatureCertificate = DigitalCertificate.LoadCertificate(@"C:\Demo\elaine.pfx", "123456");

ps.SignatureStandard = PdfSignatureStandard.PadesLT;    // PAdES-B-LT (PdfSignatureStandard.PadesLTA for PAdES-B-LTA)
ps.TimeStamping.ServerUrl = new Uri("https://ca.signfiles.com/TSAServer.aspx");

File.WriteAllBytes(@"C:\Demo\Signed\invoice-003-code-lt.pdf", ps.ApplyDigitalSignature());
Console.WriteLine("Signed: " + new FileInfo(@"C:\Demo\Signed\invoice-003-code-lt.pdf").Length + " bytes");
21.3 A certificate from the Windows store or a smart card
When the certificate is in the Windows store (for instance, a qualified certificate on a smart card, section 6.2), load it with a search criterion. No window is shown, so the code can run without a user.
PdfSignature ps = new PdfSignature("serial number");
ps.LoadPdfDocument(@"C:\Demo\Invoices\invoice-001.pdf");

// the first certificate of the current user whose common name (CN) is "Elaine Smith"
// true = only the valid certificates (issued by a trusted authority); false = any certificate, also a self-signed test one
ps.DigitalSignatureCertificate = DigitalCertificate.LoadCertificate(false, DigitalCertificateSearchCriteria.CommonNameCN, "Elaine Smith");

// only for a certificate on a smart card or on a token: the PIN, to avoid the PIN window. It applies to the next
// signature, made on this thread (a software certificate, like this one, does not use a PIN)
// DigitalCertificate.SmartCardPin = "1234";

File.WriteAllBytes(@"C:\Demo\Signed\invoice-001-code-store.pdf", ps.ApplyDigitalSignature());
Console.WriteLine("Signed with the certificate: " + ps.DigitalSignatureCertificate.Subject);SmartCardPin is cleared after every signature. When you sign several documents, set it again before each call of ApplyDigitalSignature, as in the next example. Use it only for certificates on a smart card or a token: for a software certificate it is an error. Some smart cards do not support this feature: in that case the PIN window of the middleware is shown.
Other search criteria are the other fields of the subject (OrganizationO, EmailE...), the thumbprint and the serial number of the certificate. To let the user choose the certificate in a Windows window, call DigitalCertificate.LoadCertificate() without parameters.
21.4 Sign all the documents of a folder
Create the PdfSignature object once, and load and sign each document of the folder. For a smart card, set the PIN before every signature. A document that fails must not stop the others.
PdfSignature ps = new PdfSignature("serial number");
ps.DigitalSignatureCertificate = DigitalCertificate.LoadCertificate(@"C:\Demo\elaine.pfx", "123456");
ps.SignatureStandard = PdfSignatureStandard.Pades;

foreach (string file in Directory.GetFiles(sourceFolder, "*.pdf"))
{
    try
    {
        // DigitalCertificate.SmartCardPin = "1234";      // for a smart card: before each signature
        ps.LoadPdfDocument(file);
        File.WriteAllBytes(Path.Combine(destinationFolder, Path.GetFileNameWithoutExtension(file) + "-code-folder.pdf"), ps.ApplyDigitalSignature());
        Console.WriteLine("Signed: " + Path.GetFileName(file));
    }
    catch (Exception ex)
    {
        // an error on a file does not stop the other files
        Console.WriteLine("Error: " + file + ": " + ex.Message);
    }
}
21.5 The appearance of the signature
PdfSignature ps = new PdfSignature("serial number");
ps.LoadPdfDocument(@"C:\Demo\Invoices\invoice-001.pdf");
ps.DigitalSignatureCertificate = DigitalCertificate.LoadCertificate(@"C:\Demo\elaine.pfx", "123456");

ps.VisibleSignature = true;                                               // false = invisible signature
ps.SignaturePages = new List<int> { 1, int.MaxValue };                    // the pages of the signature (int.MaxValue = the last page)
ps.SignatureAdvancedPosition = new System.Drawing.Rectangle(300, 40, 220, 70);   // x, y (from the bottom left corner), width, height
ps.FontName = "Helvetica";
ps.SignatureText = "Digitally signed by Elaine Smith";                      // your own text, instead of the default text

File.WriteAllBytes(@"C:\Demo\Signed\invoice-001-code-appearance.pdf", ps.ApplyDigitalSignature());
Console.WriteLine("Signed: appearance on the pages of the list");
The signature box can also contain an image (SignatureImage, SignatureImageType) and uses the font of your choice (FontName for the standard fonts, FontFile for a font file).
21.6 Certify and encrypt
A certifying signature (the first signature of a document) and the encryption of the signed document, with an open password and a permissions password:
PdfSignature ps = new PdfSignature("serial number");
ps.LoadPdfDocument(@"C:\Demo\Invoices\invoice-002.pdf");
ps.DigitalSignatureCertificate = DigitalCertificate.LoadCertificate(@"C:\Demo\elaine.pfx", "123456");

// a certifying signature: only the author, and only on a document that is not signed yet
ps.CertifySignature = CertifyMethod.NoChangesAllowed;

File.WriteAllBytes(@"C:\Demo\Signed\invoice-002-code-certified.pdf", ps.ApplyDigitalSignature());

PdfSignature check = new PdfSignature("serial number");
check.LoadPdfDocument(@"C:\Demo\Signed\invoice-002-code-certified.pdf");
Console.WriteLine("Certification level: " + check.DocumentProperties.CertificationLevel);
PdfSignature ps = new PdfSignature("serial number");
ps.LoadPdfDocument(@"C:\Demo\Invoices\invoice-001.pdf");
ps.DigitalSignatureCertificate = DigitalCertificate.LoadCertificate(@"C:\Demo\elaine.pfx", "123456");
ps.Encryption.EncryptionMethod = PdfEncryptionMethod.PasswordSecurity;
ps.Encryption.EncryptionAlgorithm = PdfEncryptionAlgorithm.EnhancedEncryption128BitAES;
ps.Encryption.OwnerPassword = "permissions-password"; // to change the restrictions
ps.Encryption.UserPassword = "open-password"; // to open the document (optional)
ps.Encryption.DocumentRestrictions = PdfDocumentRestrictions.AllowPrinting; // what the recipients can do
File.WriteAllBytes(@"C:\Demo\Signed\invoice-001-code-encrypted.pdf", ps.ApplyDigitalSignature());
Console.WriteLine("Signed and encrypted");The encrypted document cannot be signed with PadesLT or PadesLTA: the library stops with the error PdfReader not opened with owner password.
21.7 Protected and damaged documents
A document protected with a password is signed with its owner password, which must be set before the document is loaded:
PdfSignature ps = new PdfSignature("serial number");

// a protected document is signed with its owner password (the permissions password): set it before loading the document
ps.DocumentProperties.Password = "permissions-password";
ps.LoadPdfDocument(@"C:\Demo\Signed\invoice-001-code-encrypted.pdf");
ps.DigitalSignatureCertificate = DigitalCertificate.LoadCertificate(@"C:\Demo\elaine.pfx", "123456");

try
{
    File.WriteAllBytes(@"C:\Demo\Signed\invoice-001-code-encrypted-2.pdf", ps.ApplyDigitalSignature());
    Console.WriteLine("Signed a protected document");
}
catch (Exception ex)
{
    Console.WriteLine("Not signed: " + ex.Message);
}
A damaged document (its structure had to be repaired when it was loaded, DocumentProperties.IsDamaged) is rebuilt before signing. If it already has signatures, the rebuild makes them invalid, so the library signs it only when you allow it with RebuildDamagedSignedDocument:
PdfSignature ps = new PdfSignature("serial number");
ps.LoadPdfDocument(@"C:\Demo\Check\invoice-damaged.pdf");
ps.DigitalSignatureCertificate = DigitalCertificate.LoadCertificate(@"C:\Demo\elaine.pfx", "123456");

Console.WriteLine("Damaged: " + ps.DocumentProperties.IsDamaged + ", signatures: " + ps.DocumentProperties.DigitalSignatures.Count);

// a damaged document that is already signed is rebuilt only when you allow it: the existing signatures become invalid
try
{
    ps.ApplyDigitalSignature();
}
catch (InvalidOperationException ex)
{
    Console.WriteLine("Not signed: " + ex.Message);
    ps.RebuildDamagedSignedDocument = true;
    File.WriteAllBytes(@"C:\Demo\Check\invoice-damaged-rebuilt.pdf", ps.ApplyDigitalSignature());
    Console.WriteLine("Signed after the rebuild");
}
The result:
Damaged: True, signatures: 1
Not signed: The PDF document is damaged (its structure has errors that were repaired when it was loaded) and it is already signed. A damaged document cannot be signed incrementally: it must be rebuilt, which makes the existing signatures invalid. Set RebuildDamagedSignedDocument to true to sign it anyway.
Signed after the rebuild
21.8 Good to know
| Situation | What happens |
|---|---|
No valid serial number in new PdfSignature("...") | The library works in demonstration mode: it writes a message on the console and adds the text SignLib.dll DEMO VERSION on the first page of the documents. |
DigitalSignatureCertificate not set | A NullReferenceException is thrown (Digital certificate is not set.). |
ApplyDigitalSignature before LoadPdfDocument | A NullReferenceException is thrown (Document is not loaded.). |
| The document does not exist | A FileNotFoundException is thrown. |
| The password of the PFX file is wrong | A CryptographicException is thrown by DigitalCertificate.LoadCertificate. |
| A page of the signature that the document does not have | An ArgumentOutOfRangeException is thrown (Invalid signature page number). Check DocumentProperties.NumberOfPages, or use SignaturePages with int.MaxValue for the last page. |
| The signature cannot be created (for example, a wrong PIN) | An exception is thrown. Do not retry with the same PIN: repeated wrong PINs lock the card. |
PadesLTA without TimeStamping.ServerUrl | A NullReferenceException is thrown (Time Stamp Server URL must be set.). |
PadesLT without TimeStamping.ServerUrl | No error, but the signature has no time stamp: it is not a complete PAdES-B-LT signature. Always set the address of the time stamp server for PAdES-B-T, -LT and -LTA. |
| The size of the CRL | The largest CRL that is included in the long term formats can be limited with ps.MaxCrlSize (in bytes; the default is 1 MB). |
The code creates the same PAdES signature whatever the certificate is. A qualified electronic signature needs a qualified certificate on a QSCD (section 7): load the certificate of the smart card or of the token as in section 21.3, and check the result with the European validator (section 7.4).
22. Problems and solutions
The messages of the program are written here as the program shows them.
Installation, registration and certificates
| What you see | What to do |
|---|---|
| Windows protected your PC when you start the setup | Windows SmartScreen does not know the new setup file yet. Click More info and then Run anyway, if you downloaded the file from www.signfiles.com (section 2). |
| Invalid license code. | The serial number has 20 characters. Retype it exactly as you received it, without extra characters. A license code is made for one product: the code of another product, for example of PDF Signer, does not register PDF Signer Server (section 3). |
| PDF Signer Server has expired. Would you like to purchase the registered version...? | The trial period ended. Register with your license code (section 3). |
| Digital certificate is not set. In order to add a signature on the PDF documents, select a digital certificate. | No certificate is selected, or the certificate of the configuration was not found (for example the token is not inserted). Insert the token, or click Select the Digital Certificate... and choose a certificate (section 6). |
| The certificate of the smart card or USB token is not in the list | Connect the token and check that its middleware is installed. The certificate must be in the Windows Certificate Store: open certmgr.msc and look in Personal. If it is not there, use the options of the middleware that copy or register the certificates in the Windows store, or use the PKCS#11 interface (section 6.3). |
| The digital certificate ... expired on ... An expired certificate cannot be used to sign documents. | Choose a valid certificate or renew yours with your provider. |
| The program warns you when you select a certificate, and OK does not accept it | The certificate is expired (or not valid yet). It is at the end of the list, marked EXPIRED. Select a valid certificate or renew yours (section 6.4). |
| The Smart Card PIN box is not available | The PIN can be saved only for a certificate on a token or a smart card. For a certificate of your computer or a PFX file there is no PIN. |
| The certificate of a token that I just inserted is not in the list | Click Refresh in the certificate window (section 6.4). |
| The private key of the selected certificate cannot be found. The certificate cannot be used for digital signature operations. | The certificate on the computer has no key to sign with. Import the full certificate (including the private key), or connect your USB token. |
| Error obtaining the certificate from the PFX file. Probably PFX password is not correct or the PFX file is invalid | Retype the password of the PFX file in the certificate window (section 6.4). |
| PKCS#11 library not found: ... (also The certificate file does not exist., Certificate PIN cannot be empty., Slot number must be a positive number) | Correct the field of the PKCS#11 group that the message names, and click Test (section 6.3). |
| The PIN was rejected by the smart card or by the PKCS#11 device and it is not used again until the application is restarted... | Stop and check the PIN before you try again: most devices are blocked after a few wrong attempts. Correct the PIN in the certificate window (for a PKCS#11 device, click Test to check it). If the device is blocked, contact the provider of the certificate (section 6.2). |
Signing
| What you see | What to do |
|---|---|
| PDF header signature not found. | The file is not a valid PDF document (for example a document of another kind with the extension .pdf, or a file that was not copied completely). Open it with a PDF reader to check it. |
| An error has occurred: Unable to connect to the remote server (when the signing needs a time stamp server, or the servers that check the certificate, OCSP and CRL) | Check the Internet connection of the computer, and the address in Time Stamping Settings... (section 8). |
| Enter at least one password... or The open password and the permissions password must be different... | In the encryption window, type the passwords as the message says (section 10). |
| An encrypted document cannot be signed with the PAdES-B-LT (or LTA) signature format... | Select the PAdES-B-T format, or untick Encrypt document (section 10). |
| The PDF document is protected with a password and it cannot be opened... or ... it can be signed only with its owner password... | Tick Owner password of encrypted PDFs and type the owner (permissions) password of the document (section 11). |
| The PDF document is damaged ... and it already contains signatures... | Click No to keep the existing signatures valid, or Yes to rebuild the document and sign it (the existing signatures become invalid) (section 11). In the automatic signing and in the command line the document is not signed. |
| The destination folder cannot be the same as the source folder. | Choose another destination folder: the originals must not be overwritten. |
| The destination folder does not exist. | Create the destination folder, or choose another one (section 12). |
| The selected folder does not contain PDF documents. / The source folder does not contain PDF documents. | Pick a folder that contains PDF documents. Only the documents of the folder itself are signed, not those of its subfolders. |
| The destination file for the signed PDF document already exists. Would you like to overwrite the existing file? | Click Yes to replace it, or No and choose another file name. |
| The configuration contains values that are not valid ... | The program lists the values and uses the default ones. Check the settings, then save them again (section 17). |
Folder automation, e-mail and FTP
| What you see | What to do |
|---|---|
| The same documents are signed again and again | The originals stay in the source folder, so they are found at every check. Tick Delete the original file after it is successfully signed and set a backup folder (section 13.2). |
| A document stays in the source folder and fails at every check | It cannot be signed (see the error log). Set an error folder so that it is moved away, and correct the problem (section 13.2). |
| The program does not sign the new documents | Check, in this order: the option A folder with PDF documents is selected; Check the source folder for new files is ticked; the program is running and the Windows session is open; the status bar shows Next Sync; the certificate is valid and the token is connected; the destination folder exists. Then read the error log (section 17.1). |
| The automatic signing stopped by itself | The PIN was rejected, or somebody clicked Cancel (section 13). Correct the cause and tick the option again. |
| The file was digitally signed successfully, but: ... the file was not sent by email: Failure sending mail. | The mail server cannot be reached or refuses the message. Check the server, the port, Enable SSL and the user name and password in Email Settings... (section 14.1). The signed document is in the destination folder. |
| ... the file was not uploaded to the FTP server: Unable to connect to the remote server | Check the name of the server, the user name and the password in FTP Settings..., and try with Use passive mode switched on (section 14.3). The folder of the server must exist. |
| Invalid CSV file: Invalid email address in CSV file... or The CSV file with the e-mail addresses does not exist. See the Email Settings. | Open the CSV file, correct the address that the message names (the second column), and select the file again in Email Settings... (section 14.2). |
| A document was signed but not sent by e-mail, and no message appeared | With a CSV file the problems of the sending are only written in the error log, for example Recipient email address was not found on the CSV file. Add a line for the document (section 14.2). |
| The command does nothing, or the result code is 2 | Read the message in the command window (section 18). The usual causes: a path that ends with a backslash inside quotes, a destination folder that does not exist, a configuration file that does not exist, an expired certificate, or a program that is not registered. |
Checking the signatures and the library
| What you see | What to do |
|---|---|
| Adobe Reader says that the validity of the signature is unknown | The certificate is not issued by an authority that Adobe trusts. See section 15. |
| The European validator reports the signature as not trusted (indeterminate) | The certificate is not issued by a trusted provider, for example a self-signed test certificate. Sign with a certificate issued by a certification authority, and with a qualified certificate on a QSCD for a qualified signature (section 7.4). |
| Library: the program writes This is a demo version of SignLib.dll. | The serial number of the library is missing or not valid. Write the serial number in new PdfSignature("...") (section 21). |
Visit www.signfiles.com or use the contact link shown in the registration window, www.signfiles.com/contact. When you write to us, send the lines of the error log that describe the problem (section 17.1).
23. Glossary
| Term | In plain words |
|---|---|
| Digital signature | An electronic seal added to a document. It shows who signed and that the content was not changed. |
| eIDAS | The Regulation (EU) No 910/2014 on electronic identification and trust services. It defines the electronic signatures, seals and time stamps recognised in the European Union. |
| AdES | Advanced electronic signature: a signature that identifies the signer, is under the sole control of the signer and detects any change of the document. |
| QES | Qualified electronic signature: an advanced signature created with a qualified certificate on a QSCD. It has the legal effect of a handwritten signature. |
| Electronic seal | The electronic signature of a legal entity (a company, an institution). It proves the origin and the integrity of a document. A qualified electronic seal is made with a qualified certificate on a QSCD. |
| QSCD | Qualified signature creation device: a certified device, usually a smart card, a USB token or a hardware security module, that keeps the private key and signs inside it. |
| Qualified certificate | A certificate issued by a qualified trust service provider, listed in the EU Trusted Lists. |
| Qualified time stamp | A time stamp issued by a qualified trust service provider. The date and the time that it shows are presumed accurate in all the Member States. |
| EU Trusted Lists | The lists published by the Member States with the qualified trust service providers and their services. Validators use them to decide whether a certificate is qualified. |
| DSS | The open validation tool of the European Commission (Digital Signature Service), which checks signatures according to the eIDAS rules. |
| PAdES | The European standard (ETSI EN 319 142-1) for the signatures of PDF documents. The levels B-B, B-T, B-LT and B-LTA add the time stamp and the long term validation data. |
| Digital certificate | An electronic identity card, issued by a certification authority. It contains the name of its owner (a person or a company) and a key used to sign. |
| PFX file | A file (.pfx or .p12, the PKCS#12 format) that holds a certificate and its private key, protected by a password. |
| Windows Certificate Store | The place where Windows keeps the certificates installed on the computer or available from tokens and smart cards. It is not the Microsoft Store of applications. Open it with certmgr.msc. |
| Private key | The secret part of a certificate. Only its owner should have it. It is what makes a signature the owner's. |
| Smart card / USB token | A small device that keeps a private key and signs inside it, so the key cannot be copied. It is protected by a PIN. |
| Middleware | The software delivered with a smart card or token (for example SafeNet Authentication Client). It lets Windows and the programs use the device, and usually adds its certificates to the Windows store. |
| HSM | Hardware Security Module: a device that keeps the keys of a company and signs on request. |
| PKCS#11 | The standard way for a program to use the keys of a token, smart card or hardware security module, through the library of the manufacturer. |
| Windows SmartScreen | A protection of Windows that warns you about programs it does not know yet. A warning does not mean that the program is infected. |
| Hash (SHA256) | A short fingerprint of the document. If the document changes, the fingerprint changes. |
| Time stamp / TSA | A proof of time issued by a trusted independent service (Time Stamp Authority). |
| OCSP / CRL | Ways to ask the certification authority whether a certificate was cancelled (revoked). The answers can be stored in the signature. |
| LTV | Long Term Validation: the signature carries the proofs needed to validate it also after the certificate expires. |
| Certifying signature | The first signature of the author of a document, which also sets which changes are allowed afterwards. |
| Owner password | The password that allows changes of a protected PDF document (also its signing). It is not the password that only opens the document (the user password). |
| Self-signed certificate | A certificate you create yourself. It works technically but nobody else trusts it. Use it only for tests. |
| Source folder, destination folder | The folder with the documents to sign, and the folder where the signed documents are saved. |
| Folder automation | The function that checks the source folder at an interval and signs the new documents without a user. |
| Backup folder, error folder | The folder where the original documents are copied after they are signed, and the folder where the documents that could not be signed are moved. |
| SMTP | The protocol of the outgoing e-mail. The SMTP server is the mail server that sends your messages. |
| FTP | A protocol for copying files to a server. In its plain form, used by the program, the data are not encrypted. |
| CSV file | A plain text file with values separated by commas. It is used here to tell which signed document is sent to which e-mail address. |
| Serial number (license code) | The code that registers PDF Signer Server, received after the purchase. The Signature Library has its own serial number. |
| SignLib (Signature Library) | The .NET library on which PDF Signer Server is built. It lets programs and PowerShell scripts create and verify the same signatures. |
| Bulk signing | Signing many documents in one operation, or automatically, without a user. |
24. Warning and disclaimer, trademarks
Every effort has been made to make this manual as complete and accurate as possible, but no warranty or fitness is implied. The information provided is on an “as is” basis. The author shall have neither liability nor responsibility to any person or entity with respect to any loss or damages arising from the information contained in this manual. The information about the eIDAS Regulation is a simplified explanation and it is not legal advice.
.NET, Windows, PowerShell, SmartScreen and Visual Studio are trademarks of Microsoft Corporation. Adobe and Adobe Reader are trademarks of Adobe Inc. All other trademarks are the property of their respective owners.